
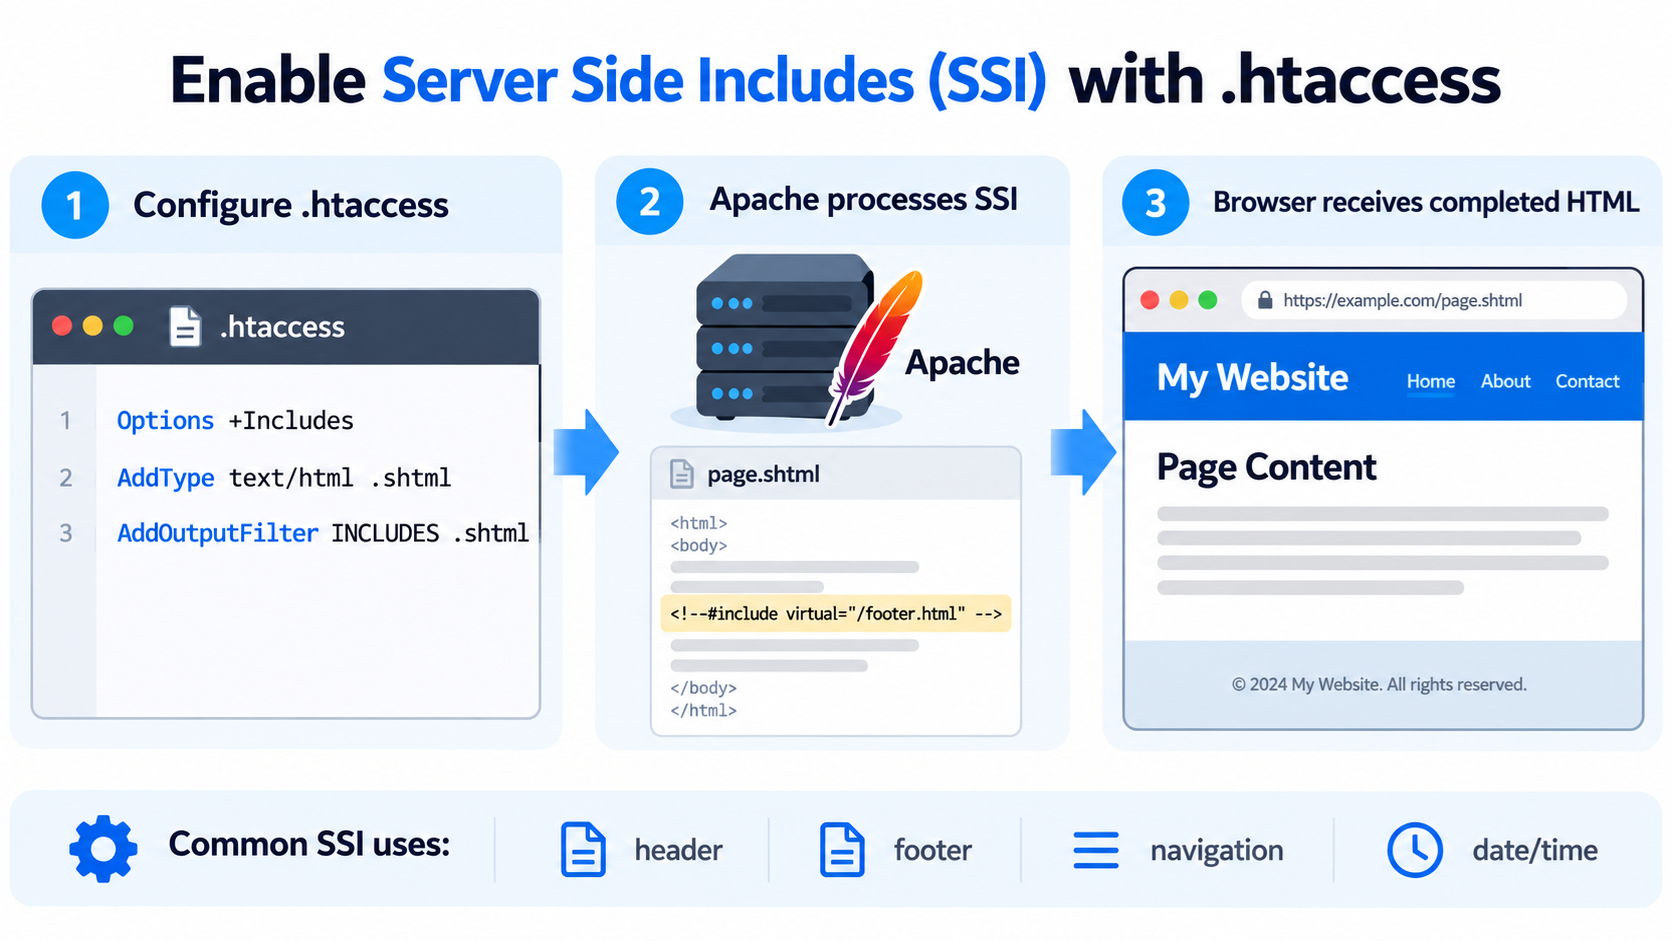
Server Side Includes (SSI) is a useful feature of the Apache HTTP Server that allows you to insert dynamic content into HTML pages without building a complete server-side application.
With SSI, you can reuse common website components, display information generated by the server, and include content from other files.
For example, instead of manually updating the same footer on 100 HTML pages, you can store the footer in one file and automatically include it wherever needed.
If your website runs on Apache and your hosting provider permits SSI configuration, you can enable this functionality using the .htaccess file.
In this tutorial, we will explain what Server Side Includes are, how they work, how to enable SSI through .htaccess, and how to troubleshoot common problems.
We will also cover important security considerations and explain when SSI is still useful for modern websites.
What Are Server Side Includes (SSI)?
Server Side Includes, commonly abbreviated as SSI, is a server-side processing technology that allows Apache to examine specially formatted instructions embedded within HTML documents.
Before sending a requested page to the browser, Apache processes these instructions and replaces them with the appropriate content.
For example, an HTML page might contain an SSI instruction requesting that Apache insert a shared navigation menu.
When a visitor opens the page, Apache reads the instruction, retrieves the referenced file, and inserts its contents into the page before delivering the response.
The visitor receives the resulting HTML rather than the original SSI instruction.
SSI processing is provided by Apache’s mod_include module, which implements the INCLUDES output filter.
Unlike JavaScript, which normally runs in the browser, SSI processing takes place on the web server before the response is sent to the visitor.
This makes SSI useful for simple server-side content assembly without requiring a full application framework.
How Do Server Side Includes Work?
To understand SSI, imagine a website containing 50 static HTML pages.
Every page has the same header, navigation menu, and footer.
Without SSI, you might duplicate these elements across all 50 pages.
Whenever you change the navigation menu, you would need to update every page containing that menu.
With SSI, you can create separate files for the shared components and include them inside your main pages.
For example, your website could contain the following files:
index.shtml
about.shtml
contact.shtml
header.html
footer.html
The .shtml files contain the main page content, while header.html and footer.html contain reusable HTML fragments.
When someone requests index.shtml, Apache processes the SSI instructions and inserts the contents of the shared files into the response.
If you later update footer.html, every page that includes it will use the updated content when Apache processes a new request.
This approach reduces duplicated markup and makes maintaining a small website much easier.
What Is the .htaccess File?
The .htaccess file is a directory-level configuration file used by the Apache HTTP Server.
It allows website administrators to control selected Apache settings without modifying the main server configuration.
Depending on your hosting environment, .htaccess may be used for URL redirects, access restrictions, custom error pages, MIME type configuration, caching rules, and Server Side Includes.
The file is commonly located in the website’s document root. On many shared hosting accounts, this directory is named public_html.
Apache applies permitted .htaccess directives to the directory containing the file and, where applicable, its subdirectories.
However, .htaccess settings only work when the main Apache configuration allows the relevant directives.
Important: Websites running only on Nginx do not use .htaccess files. If your website uses Nginx, SSI must be configured using Nginx’s own configuration system.
Requirements for Enabling SSI
Before enabling Server Side Includes, make sure your hosting environment meets several requirements.
First, your website must be served by Apache or an environment that supports compatible SSI processing.
Second, Apache’s mod_include module must be available and enabled. This module handles SSI instructions embedded in supported documents.
Third, Apache must permit the required configuration directives in .htaccess.
The Options directive requires suitable server permissions, such as AllowOverride Options or an appropriate AllowOverrideList setting.
The AddType and AddOutputFilter directives also need to be allowed by the server configuration.
On shared hosting, your hosting provider controls these permissions.
Finally, your website must contain files that Apache is configured to process for SSI. Traditionally, these files use the .shtml extension.
You cannot activate a disabled Apache module simply by adding SSI directives to .htaccess.
If mod_include is unavailable, the server administrator or hosting provider must enable it.
Step 1: Locate Your .htaccess File
The first step is to locate the .htaccess file associated with your website.
If you use cPanel, open File Manager and navigate to your website’s document root, commonly public_html.
Because filenames beginning with a period are often hidden, you may need to enable the option to show hidden files.
You can also locate the file through an SFTP client or SSH connection if your hosting provider supports those methods.
If .htaccess already exists, download a backup before editing it. Existing WordPress, redirect, or security rules should remain intact.
If the file does not exist, you can create a new plain-text file named exactly:
.htaccess
Make sure the filename does not accidentally become .htaccess.txt.
Once you have located or created the file, open it with a plain-text editor.
Step 2: Enable SSI Using .htaccess
Apache provides a straightforward configuration for processing SSI directives in .shtml files.
Add the following three directives to your .htaccess file:
Options +Includes
AddType text/html .shtml
AddOutputFilter INCLUDES .shtml
These directives perform different functions.
Options +Includes enables Server Side Includes processing for the applicable directory.
AddType text/html .shtml tells Apache to identify files ending in .shtml as HTML documents.
AddOutputFilter INCLUDES .shtml instructs Apache to apply the INCLUDES output filter to files with the .shtml extension.
Together, these settings allow Apache to process SSI instructions contained in .shtml files before delivering the resulting HTML to the browser.
The leading plus sign in +Includes is important because it enables the specified directory option without replacing the entire existing Options configuration.
Save the .htaccess file after adding these directives.
This configuration follows the method documented by the Apache HTTP Server project.
Step 3: Create a Test SSI Page
After updating .htaccess, the next step is to verify that SSI processing works.
Create a new plain-text file named:
test.shtml
Place the file in the directory where you enabled SSI.
Add the following content:
<html>
<head><title>SSI Test</title></head>
<body>
<h1>Server Side Includes Test</h1>
<p>Current server time: <!--#echo var="DATE_LOCAL" --></p>
</body>
</html>
The important part is the SSI instruction:
<!--#echo var="DATE_LOCAL" -->
This instruction tells Apache to insert the local date and time available to the SSI processor.
When SSI works correctly, the browser should display the heading followed by a date and time value.
For example, the page might display:
Server Side Includes Test
Current server time: Friday, 09-Oct-2026 07:30:00 PDT
The exact date, time, timezone, and formatting depend on the server configuration. This is only an illustrative example.
If you inspect the delivered HTML response, the SSI instruction should have been replaced with its generated output.
If the browser receives the original SSI instruction unchanged, SSI processing may not be enabled or the file may not be passing through the INCLUDES filter.
Step 4: Open the SSI Test Page in Your Browser
Upload or save test.shtml in your website’s document root.
Then open the page using its full URL:
https://example.com/test.shtml
Replace example.com with your own domain name.
If everything is configured correctly, Apache should process the SSI instruction and display the generated content.
Because SSI is processed on the server, you generally do not need to restart Apache after modifying a permitted .htaccess configuration.
However, cached responses may prevent you from immediately seeing the latest output. If necessary, bypass relevant browser or CDN caches while testing.
If the page returns a 500 Internal Server Error, restore the previous .htaccess configuration and inspect the Apache error log.
This usually indicates a configuration problem, a directive restriction, or another server-side error.
Step 5: Include Another HTML File Using SSI
One of the most practical uses of SSI is including reusable HTML components.
For example, imagine that every page on your website contains the same footer.
Instead of repeating the footer markup, create a separate file named:
footer.html
Add the following content to the file:
<footer>
<p>Copyright Webmind. All rights reserved.</p>
</footer>
Next, create or modify a .shtml page and insert the following SSI instruction where you want the footer to appear:
<!--#include virtual="/footer.html" -->
When Apache processes the page, it inserts the contents of footer.html at that location.
You can use the same instruction on multiple pages.
Whenever you update footer.html, the updated footer can appear on all pages that include it when those pages are subsequently processed.
This is particularly convenient for small websites that use static HTML files.
Understanding the SSI Include Directive
The SSI include directive supports different ways to reference content.
Two commonly used attributes are file and virtual.
The file attribute identifies a file relative to the directory containing the current SSI document.
For example:
<!--#include file="footer.html" -->
This instructs Apache to include footer.html from the current file’s directory.
The virtual attribute references a URL path handled by the web server.
For example:
<!--#include virtual="/includes/footer.html" -->
This requests the resource through Apache’s URL handling mechanism and inserts the generated response content.
The virtual attribute is often more flexible because it can reference resources through website URL paths rather than just relative filesystem locations.
For a website with multiple directories and shared components, virtual is frequently the more convenient choice.
The file attribute cannot be used to include arbitrary files outside its permitted relative location.
In particular, parent-directory traversal using ../ is not allowed for that attribute.
When using either method, make sure the referenced resource exists and is accessible to the server.
Step 6: Display Server Variables Using SSI
SSI can also display certain server and request-related variables.
The echo directive outputs the value of an available variable.
For example:
<!--#echo var="DATE_LOCAL" -->
This displays the local date and time according to the SSI processing environment.
Another example is:
<!--#echo var="DOCUMENT_NAME" -->
This can display the name of the current document.
You may also use:
<!--#echo var="LAST_MODIFIED" -->
This can display the last modification time of the current document.
These features can be useful for simple informational pages, administrative pages, and server demonstrations.
However, the availability and exact behavior of variables can depend on the server environment.
Avoid exposing sensitive request or server information to public visitors without a clear reason.
Step 7: Display the Last Modified Date of a File
SSI provides a directive called flastmod that displays the modification time of a specified file.
For example:
<!--#flastmod file="footer.html" -->
This tells Apache to display the last modification time of footer.html.
You could use this functionality to indicate when a document or related resource was updated.
Apache also supports formatting options for certain SSI output values.
However, displayed modification times reflect filesystem or server metadata and should not automatically be treated as a reliable editorial publication date.
For content management systems, publication and update dates are usually better managed through the application’s own metadata.
Step 8: Display a File’s Size Using SSI
Another useful SSI directive is fsize.
For example:
<!--#fsize file="guide.pdf" -->
This displays the size of the referenced file using the applicable SSI formatting rules.
A download page could use this directive to display the file size next to a link.
For example, a page might contain a download link for guide.pdf followed by the SSI-generated file size.
This can be helpful when distributing documentation, software packages, or downloadable resources from a simple static website.
Remember that the referenced file must exist and be accessible under Apache’s applicable rules.
Step 9: Enable SSI for Regular .html Files
By default, the traditional SSI setup uses the .shtml extension.
However, it is technically possible to configure Apache to process SSI instructions in ordinary .html files.
For example, you could use the following directives:
Options +Includes
AddType text/html .html
AddOutputFilter INCLUDES .html
With this configuration, Apache applies the INCLUDES filter to matching .html files in the applicable directory.
You would then be able to place SSI instructions inside ordinary HTML documents.
However, enabling SSI for all .html files is generally not recommended unless you have a specific requirement.
Apache must process matching files through the SSI filter even when they do not contain SSI directives.
This creates unnecessary processing overhead and potentially increases the configuration’s security exposure.
For many websites, using .shtml only where SSI is needed is a cleaner approach.
You should also avoid adding SSI filtering indiscriminately to files handled by a content management system or application framework.
Step 10: Use IncludesNOEXEC for a Safer Configuration
SSI historically includes features that can interact with executable server-side programs.
Some of these capabilities can introduce security risks if untrusted users can modify SSI-enabled files.
Apache provides an option called IncludesNOEXEC that restricts certain SSI execution capabilities.
For a website that only needs simple file inclusion and variable display, this is often preferable to unrestricted Includes.
A more restrictive configuration can use:
Options +IncludesNOEXEC
AddType text/html .shtml
AddOutputFilter INCLUDES .shtml
The IncludesNOEXEC option allows SSI processing while restricting the execution of external commands through SSI-related mechanisms.
It also limits the handling of included resources in certain situations.
For example, it is not intended for including the dynamically executed output of arbitrary CGI programs.
For websites that only need reusable headers, footers, and simple SSI variables, IncludesNOEXEC is a sensible starting point.
It is not a complete security sandbox, however. Included content and SSI processing still require appropriate filesystem permissions, access controls, and careful handling of untrusted material.
Use either the IncludesNOEXEC configuration or the broader Includes configuration according to your requirements, rather than combining conflicting options without understanding their effects.
Security Considerations When Using SSI
Because SSI instructions are processed by the server, they should be treated as server-side functionality rather than harmless HTML comments.
If an attacker can upload or modify files that Apache processes through SSI, the attacker may be able to influence the generated response or abuse any capabilities that the server permits.
The risks become more significant when command execution or unrestricted program inclusion is enabled.
For this reason, you should not enable SSI for user-uploaded content directories.
You should also restrict write access to SSI-enabled files and avoid allowing untrusted users to insert SSI instructions into content that the server will process.
Use IncludesNOEXEC when executable SSI functionality is not required.
Remember that even non-executable file inclusion can expose content if permissions and file access rules are configured incorrectly.
SSI should never be used as a substitute for proper authentication, file access controls, or secure application design.
How to Disable SSI Using .htaccess
If you previously enabled SSI and no longer need it, you can remove the AddOutputFilter and related MIME configuration you added.
For example, remove these lines if they were introduced solely for SSI:
AddType text/html .shtml
AddOutputFilter INCLUDES .shtml
You should also remove or revise the SSI-related Options setting if it is no longer needed.
However, simply removing local directives does not necessarily disable SSI if it is enabled in a higher-level server configuration.
If you need to explicitly disable the SSI directory option in a configuration that permits it, Apache supports:
Options -Includes
Be aware that Options settings and other inherited configuration may affect the final behavior, and the availability of this directive depends on server permissions.
If your hosting provider enables SSI globally, contact the provider or review the inherited configuration before assuming that removing a local rule completely disables it.
Common Problems When Enabling SSI
1. SSI Instructions Appear as Comments
If the page source still contains the original SSI instructions, Apache may not be processing the file through the INCLUDES filter.
Check that the file uses the expected .shtml extension and that your .htaccess configuration includes the necessary AddOutputFilter directive.
Also confirm that mod_include is enabled and the SSI-related Options setting is permitted.
A browser may hide unprocessed SSI comments from the visible page, so inspect the HTML response source rather than relying only on what appears on screen.
2. The Website Returns a 500 Internal Server Error
An invalid directive or an Apache configuration permission restriction can cause this error.
For example, your hosting provider may not allow Options +Includes inside .htaccess.
Check the Apache error log for the specific cause.
If you are using shared hosting, ask your provider whether SSI configuration is supported and which directives are allowed.
3. The Included File Does Not Appear
First, verify that the referenced file exists and that the include path is correct.
For example:
<!--#include virtual="/includes/header.html" -->
The path must correspond to the correct URL resource.
Also confirm that the server can access the included content and that the request is not blocked by access restrictions.
A missing file, incorrect path, or incompatible included resource can cause SSI inclusion to fail.
4. SSI Works in .shtml but Not .html
This is expected if the INCLUDES output filter is configured only for .shtml files.
To process ordinary .html files, an additional filter association would be required.
However, it is generally preferable to keep SSI processing limited to designated files rather than expanding it across the entire website.
5. SSI Does Not Work on WordPress Pages
WordPress generally generates pages through PHP and its own content management system.
An Apache SSI rule for .shtml files does not automatically make SSI instructions work inside WordPress posts or pages.
WordPress content may be generated dynamically and processed through different response handlers.
For reusable WordPress components, themes, template parts, blocks, or appropriate plugins are normally more suitable than SSI.
If you have a separate collection of static .shtml files hosted alongside WordPress, Apache may still process SSI in those files when properly configured.
6. SSI Output Does Not Update
If the included content or generated value appears outdated, inspect any caching layers between Apache and the visitor.
Browser caches, reverse proxies, and CDNs can store responses that were previously generated by SSI.
The SSI instructions may be functioning correctly while visitors continue receiving cached HTML.
Review the caching policy for SSI-generated pages and adjust it according to how frequently the content changes.
SSI vs. PHP: What Is the Difference?
Server Side Includes and PHP are both capable of generating content on the server, but they serve different purposes.
SSI is primarily intended for straightforward operations such as inserting reusable file fragments, displaying predefined variables, and performing limited conditional processing.
PHP is a general-purpose programming language that supports extensive application logic, database operations, authentication systems, APIs, and dynamic web applications.
For example, if your goal is simply to reuse a common footer across several static pages, SSI can be a lightweight solution.
If your website requires user accounts, database-driven content, shopping carts, or complex business logic, PHP or another application technology is usually more appropriate.
SSI is not intended to replace modern application frameworks.
Nevertheless, it remains useful in certain static websites, legacy systems, documentation sites, and simple server-managed HTML projects.
Is Server Side Includes Still Useful Today?
SSI is an older web technology, but it has not completely disappeared.
Modern website development often uses templates, static site generators, component systems, and application frameworks to solve problems that SSI previously addressed.
However, SSI can still be practical when you want to reuse small HTML fragments on an Apache-hosted website without introducing a larger application stack.
For example, a small documentation website might use SSI to maintain a common navigation menu across multiple pages.
A legacy website might rely on SSI for shared page components without using PHP or a database.
A system administrator might use SSI-generated pages to display limited server information.
For new projects, it is worth comparing SSI with alternatives such as static site generators or ordinary application templates before selecting an approach.
The right solution depends on your website’s complexity, hosting environment, maintenance requirements, and security expectations.
Frequently Asked Questions
What does SSI stand for?
SSI stands for Server Side Includes.
It is a technology that allows a web server to process specially formatted instructions embedded in HTML documents before sending the resulting content to visitors.
Do I need PHP to use SSI?
No. SSI processing is provided by Apache’s mod_include module and does not require PHP.
However, SSI capabilities are more limited than those of PHP.
Do I need to restart Apache after changing .htaccess?
Normally, no. Permitted .htaccess changes are generally applied as Apache processes requests.
You may still need to refresh or bypass caches to see the latest results.
Can I use SSI with HTML files?
Yes. Apache can be configured to process SSI instructions in .html files, but doing so may add unnecessary processing overhead.
Using the .shtml extension is often preferable.
Can I use SSI on shared hosting?
Possibly. Many Apache-based hosting environments support SSI, but the available features depend on your hosting provider’s configuration.
Some providers restrict SSI directives or disable certain execution-related functionality for security reasons.
Does SSI work with Nginx?
Nginx has its own SSI functionality, but it does not use Apache’s .htaccess file.
Nginx SSI must be enabled through supported Nginx configuration directives.
Is SSI secure?
SSI can be used safely when properly configured, but security depends on the permissions and features enabled.
For simple file inclusion, prefer IncludesNOEXEC where practical, restrict write access, and never allow untrusted uploads to become SSI-processed content.
Can SSI include files from another website?
SSI is not a general-purpose remote content fetching system.
Apache’s standard include mechanisms work with local files or resources handled through the server’s URL processing.
The virtual attribute does not accept an arbitrary external URL with a hostname and scheme.
If you need to fetch and integrate content from remote websites, use an appropriate application-level mechanism instead.
Conclusion
Server Side Includes provides a relatively simple way to add reusable and limited dynamic functionality to HTML pages hosted on Apache.
By enabling SSI through .htaccess, you can insert shared headers and footers, display server-generated information, and reduce repetitive HTML maintenance.
For the traditional .shtml configuration, the essential Apache directives are:
Options +Includes
AddType text/html .shtml
AddOutputFilter INCLUDES .shtml
If you only need basic file inclusion and do not require executable SSI capabilities, consider using Options +IncludesNOEXEC instead.
Always confirm that your hosting environment supports mod_include, test the configuration before deploying it widely, and avoid enabling SSI for untrusted content.
Although more modern templating technologies are available, SSI remains a useful feature for certain Apache-hosted static websites and legacy environments.