
Some parts of your website should only be accessible to authorized visitors.
You might want to keep a development site private, restrict access to documents, or protect a page intended for a small group of users.
A PHP login page does not automatically protect images, PDFs, or other files that visitors can access directly.
On an Apache web server, HTTP Basic Authentication lets you restrict access before the server delivers the protected content.
You can configure this protection with an .htaccess file or use your hosting control panel to protect a directory.

Before You Start
The manual examples below require Apache with authentication directives enabled in .htaccess.
If you are unsure whether your hosting account supports this, check with your provider.
Use HTTPS for the protected area. Basic Authentication does not encrypt usernames and passwords during transmission by itself.
HTTPS provides that protection. See Apache’s authentication documentation.
Back up any existing .htaccess file before making changes, and preserve rules already used by your website.
Password Protect a Directory
Manual password protection uses two files:
.htaccessdefines the authentication rules..htpasswdcontains the authorized usernames and password hashes.
Place .htaccess inside the directory you want to protect. For example, to protect a directory named datacenter, use:
/home/youraccount/public_html/datacenter/.htaccessAdd the following configuration:
AuthType Basic
AuthName "Member Area"
AuthBasicProvider file
AuthUserFile "/home/youraccount/.htpasswd"
Require valid-user
Replace /home/youraccount/.htpasswd with the actual server path to your password file.
The directives have these purposes:
| Directive | Purpose |
|---|---|
AuthType Basic |
Uses HTTP Basic Authentication. |
AuthName "Member Area" |
Sets the authentication realm; browsers may display this label in the login prompt. |
AuthBasicProvider file |
Checks credentials against a password file. |
AuthUserFile |
Specifies the password file’s location. |
Require valid-user |
Allows any user who authenticates successfully against that file. |
To allow only a particular user, replace the final line with:
Require user aliceWhich Content Does This Protect?
The rules normally apply to the directory containing .htaccess and its subdirectories, unless more specific configuration changes that behavior.
If you place the file in public_html, and that is your website’s document root, the rules normally cover the website served from that directory.
Other domains or subdomains with different document roots need separate consideration.
Apache’s .htaccess guide explains how these settings apply and how the server controls which directives are permitted.
Create and Store the .htpasswd File
Keep the password file outside the publicly accessible website directory. A typical arrangement is:
/home/youraccount/
├── .htpasswd
└── public_html/
    └── datacenter/
        ├── .htaccess
        └── index.html
Here, /home/youraccount/ is the hosting account’s home directory. It is different from the website’s document root, public_html, and from the server’s filesystem root, /.
Use an absolute filesystem path in AuthUserFile. Ask your hosting provider if you do not know the correct path.
A DOCUMENT_ROOT value identifies the website’s public directory; it does not tell you where a private password file must be stored.
Apache must have permission to read the password file. Its documentation recommends keeping the file outside the web-accessible directory tree. See AuthUserFile.
Generate Password Hashes with htpasswd
A password-file entry has this structure:
username:password_hashDo not replace password_hash with a plain-text password.
If SSH access and Apache’s htpasswd utility are available, create a new file and user with:
htpasswd -cB /home/youraccount/.htpasswd aliceThe utility prompts you to enter and confirm a password. The -B option selects bcrypt hashing.
Use -c only when creating a new file. It overwrites an existing password file.
To add another user without removing existing users:
htpasswd -B /home/youraccount/.htpasswd bobTo change an existing user’s password:
htpasswd -B /home/youraccount/.htpasswd aliceSee the official htpasswd documentation for available options.
If your account does not include SSH access, use your control panel’s directory-protection feature or ask your hosting provider for assistance.
Password Protect a Directory with cPanel
In cPanel, the feature is called Directory Privacy. It handles the relevant configuration, so you do not need to create the files manually.
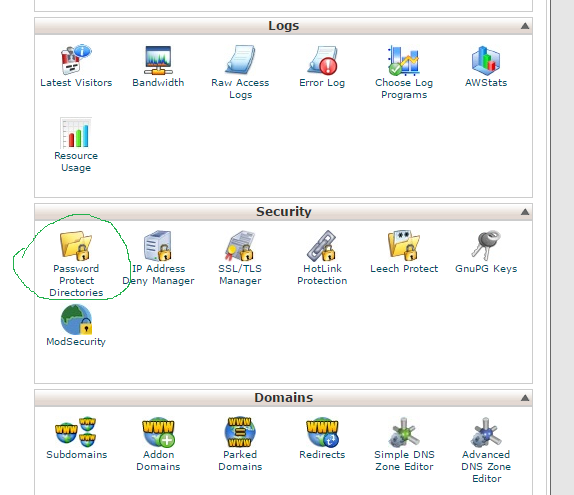
- Log in to cPanel and open Directory Privacy.
- Navigate to the directory you want to protect.
- Click Edit for that directory.
- Select Password protect this directory.
- Enter a label, such as
Member Area, and click Save. - Return to the directory’s settings.
- Under Create User, enter a username and password, then save.
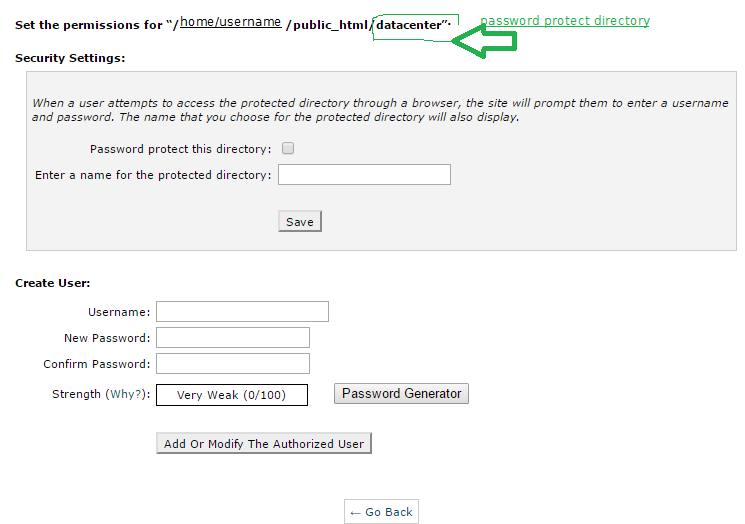
Enabling protection and creating an authorized user are separate steps. Complete both.
The label identifies the protected area; it does not rename the actual directory. This protection applies to website access, not access through FTP or SFTP.
See cPanel’s Directory Privacy guide.
Password Protect a Directory with Plesk
Plesk also provides a built-in directory-protection feature:
- Open Websites & Domains → Password-Protected Directories.
- Click Add Protected Directory.
- Enter the directory path relative to the domain’s document root.
- Optionally enter a title for the protected area, then click OK.
- Open the newly protected directory.
- Click Add a User, enter a username and password, and save.
Add at least one user so authorized visitors can access the directory.
These are Plesk’s control-panel steps; the underlying server configuration depends on the hosting platform. See Plesk’s protected-directory documentation.
Password Protect a Single File with .htaccess
To protect one file, place the authentication directives inside a <Files> block.
For example, to protect report.pdf, add the following to .htaccess in the same directory:
<Files "report.pdf">
    AuthType Basic
    AuthName "Private Report"
    AuthBasicProvider file
    AuthUserFile "/home/youraccount/.htpasswd"
    Require valid-user
</Files>
Replace report.pdf with the exact filename and update the password-file path.
This example does not require AuthGroupFile /dev/null, because it does not use group-based authorization.
Use this configuration instead of the directory-wide example when your intention is to protect only the named file.
Existing authentication rules in this or a parent directory may still restrict other content.
The <Files> directive matches filenames and can also affect matching files in subdirectories where the configuration applies.
Place the rule in the narrowest appropriate directory. See Apache’s Files documentation.
Test Your Password Protection
Open the protected address over HTTPS in a fresh private browsing session.
Confirm that:
- The browser requests a username and password.
- Canceling the prompt does not reveal the protected content.
- Incorrect credentials do not grant access.
- Correct credentials allow access.
- For single-file protection, other files intended to remain public still open normally.
If the site returns a 500 Internal Server Error, check the server’s error log or contact your hosting provider.
Possible causes include an incorrect password-file path, unreadable files, or authentication directives that are not permitted in .htaccess.
If no login prompt appears, check that the file is named exactly .htaccess, that the server supports the configuration, and that your browser is not reusing credentials from an earlier login.