
You updated your website, changed some text, replaced an image, or modified your WordPress theme. Everything looks correct in the WordPress editor, but when you visit the website, the old content is still there.
You refresh the browser, open the page again, and perhaps even restart your computer. Nothing changes. Your website continues displaying the previous version.
This is a common problem for WordPress websites and other websites using caching systems, hosting platforms, or Content Delivery Networks (CDNs).
In most cases, the problem does not mean your changes have been lost. Instead, your browser or another component between the visitor and the website may be delivering a previously stored version of the page.
However, caching is not the only possible cause. Incorrect WordPress publishing settings, DNS changes, server migrations, and outdated CSS or JavaScript files can produce similar symptoms.
In this guide, we will explain why websites display outdated content and how to troubleshoot the problem step by step, from browser caching to WordPress plugins, web servers, Cloudflare, and DNS.
1. Why Does a Website Show Old Content?
When someone visits a website, the browser does not always download every file directly from the original hosting server.
To improve performance, browsers, web servers, caching plugins, and CDNs may save copies of previously requested content.
When the same resource is requested again, a cached copy can be returned instead of generating or downloading everything again.
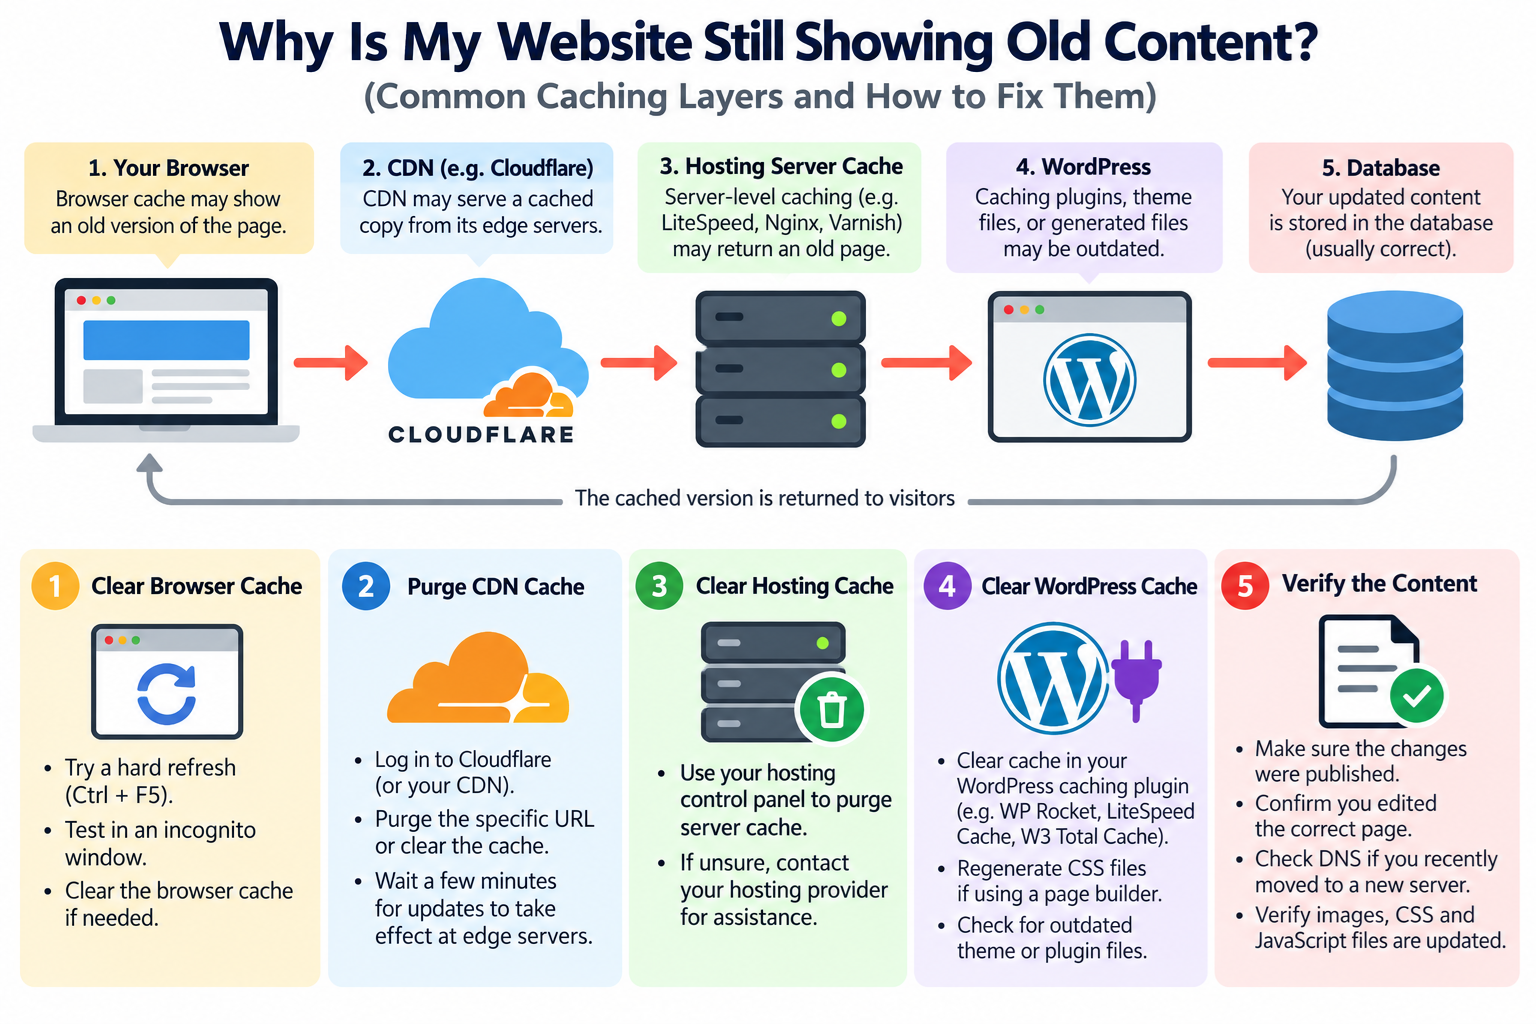
A typical website delivery process may involve several layers:
Visitor → Browser Cache → CDN Cache → Hosting Server Cache → WordPress → Database
Not every website uses all these layers. A simple website may have only browser caching, while a WordPress website behind Cloudflare may use several independent caching systems.
For example, suppose you publish an updated homepage at 10:00 AM.
WordPress saves the updated content in its database. However, a caching plugin may still contain the previous HTML version, and Cloudflare may also have a cached response from an earlier request.
Visitors could continue seeing the old homepage until the appropriate cached content expires, is revalidated, or is purged.
This behavior is not necessarily a software malfunction. Caching is designed to reduce repeated work and improve website loading performance.
The problem occurs when cached content remains available longer than intended or when changes are not correctly propagated through the website’s delivery system.
2. First, Confirm That Your Changes Were Actually Published
Before clearing any cache, verify that the updated content has been saved and published.
For WordPress websites, log in to the administration dashboard and open the post or page you recently edited.
Check whether the updated text or image appears in the editor.
Make sure you clicked Update or Publish rather than leaving the changes as an unsaved draft.
If the page contains pending revisions or scheduled changes, verify that the intended version is currently published.
Also confirm that you edited the correct page. Some WordPress websites contain multiple pages with similar titles, duplicated landing pages, or separate templates for different sections.
For websites using a page builder, the visible page may contain content generated by the builder rather than the standard WordPress content editor.
If your website uses a multilingual plugin, check that you updated the correct language version.
Finally, verify the actual public URL. The page you edited may not be the page currently linked from your navigation menu.
If the content has not been published correctly, clearing caches will not solve the problem.
3. Refresh the Browser Without Using Its Cached Files
The easiest troubleshooting step is to force the browser to request a newer version of the page.
A normal browser refresh may reuse cached resources depending on their freshness and HTTP caching rules.
A hard refresh instructs the browser to reload more resources instead of relying on its normal cached copies.
On many Windows browsers, including Chrome, Edge, and Firefox, you can use:
Ctrl + F5
Another commonly supported shortcut is:
Ctrl + Shift + R
Browser behavior can differ by application and operating system.
After performing a hard refresh, check whether the updated content appears.
If the website now displays correctly, the issue was likely related to locally cached browser resources.
However, a hard refresh does not guarantee that every upstream cache will be bypassed. A CDN or hosting server may still return its cached version.
If the old content remains, continue with the next troubleshooting step.
4. Test the Website in a Private Browsing Window
A private or incognito browsing window provides another useful diagnostic test.
Open a new private window in your browser and visit the affected page.
Private windows generally use a separate temporary browsing context, so they do not reuse the normal window’s existing browser cache in the same way.
If the updated page appears in the private window but not in your regular browser, the difference may involve browser cache, cookies, login state, or browser extensions.
If both windows show the same outdated content, the problem may be located farther upstream, such as a WordPress cache, hosting server, or CDN.
Keep in mind that a private window does not bypass Cloudflare or other shared caches.
Also, private browsing does not eliminate every difference caused by browser settings or server behavior.
For more reliable testing, compare the website in another browser or on a different device.
5. Clear the Browser Cache
If a hard refresh does not help, you can clear the browser’s stored website resources.
Modern browsers cache images, CSS stylesheets, JavaScript files, fonts, and other resources to improve performance.
These resources may remain cached even after the website owner uploads newer versions.
In Chrome or Edge, open the browser settings and locate the option for deleting browsing data.
In Firefox, open Settings and locate the privacy and site data controls.
Choose the option to clear cached website files or cached web content.
If your browser supports clearing site-specific data, it may be preferable to clear the affected website rather than removing the cache for every website.
Be careful when selecting cookies and other site data. Removing cookies may sign you out of websites and reset certain preferences.
After clearing the relevant cache, reopen the website and check whether the updated content appears.
If the website is still showing old content across multiple devices, the browser cache is less likely to be the primary cause.
6. Clear the WordPress Cache Plugin
Many WordPress websites use caching plugins to improve loading speed.
Instead of generating every page from PHP and database queries, these plugins may save pre-generated HTML pages.
When visitors request a cached page, the plugin can serve the saved HTML instead of rebuilding the page.
This can significantly improve performance, especially on websites with large amounts of mostly static content.
However, if cached pages are not properly invalidated after content updates, visitors may continue seeing older versions.
Popular WordPress caching solutions include WP Rocket, LiteSpeed Cache, W3 Total Cache, WP Super Cache, and various hosting-specific caching plugins.
The exact interface depends on the installed plugin.
For WP Rocket, look for its cache-clearing controls in the WordPress administration interface.
For LiteSpeed Cache, use the appropriate purge options under its cache management interface.
For W3 Total Cache, use its cache management or purge controls.
For WP Super Cache, locate the Delete Cache function in its settings.
After clearing the relevant cache, open the public website in a logged-out browser session and test the updated page.
If the problem disappears, the WordPress page cache was likely responsible.
If the problem returns after some time, investigate why the cache is being regenerated with old content or why updates are not triggering appropriate invalidation.
Repeatedly clearing the entire cache is not an ideal long-term solution.
A properly configured WordPress caching system should invalidate affected cached pages when content changes, subject to its features and configuration.
7. Check the Hosting Server Cache
Even if you do not have a WordPress caching plugin installed, your hosting provider may use server-level caching.
Some hosting environments implement caching through LiteSpeed, Nginx, Varnish, or proprietary hosting infrastructure.
These systems may store generated HTML responses and return them without invoking the complete WordPress application for every request.
This type of caching can reduce server load and improve website performance.
However, clearing a WordPress plugin cache does not always clear the hosting provider’s separate server cache.
For example, a website may have both a WordPress caching plugin and an independent reverse-proxy cache.
Clearing only one of them may not be enough.
Log in to your hosting control panel and check whether your provider offers a cache management feature.
If available, purge the affected page or use the provider’s cache-clearing function.
The location of this feature varies by hosting platform. Some providers integrate it with cPanel, while others offer a separate hosting dashboard.
If you cannot identify a server-level cache, contact your hosting provider and ask whether full-page caching is enabled for your domain.
For Linux VPS and dedicated server administrators, the relevant cache may be configured in Nginx, Varnish, or another reverse-proxy service.
Do not restart the entire web server simply to clear outdated content unless the caching system or server configuration specifically requires that action.
8. Clear the Cloudflare CDN Cache
Cloudflare is widely used to improve website performance, reduce bandwidth consumption, and protect websites from unwanted traffic.
When your domain uses Cloudflare’s proxy service, some website resources may be stored at Cloudflare’s edge locations.
By default, Cloudflare commonly caches eligible static resources such as images, CSS files, and JavaScript files.
Ordinary HTML pages are not necessarily cached by default. HTML caching generally requires an applicable cache rule, product configuration, or another feature that enables it.
This distinction is important because a WordPress page displaying old HTML does not automatically mean Cloudflare cached the page.
To check Cloudflare caching, log in to your Cloudflare dashboard and select the affected domain.
Open the caching management section and locate the cache purge options.
Cloudflare supports purging specific URLs and, where supported by the applicable configuration, broader cache selections.
For routine website updates, purging the affected URL is generally preferable to clearing the entire domain cache.
For example, if you replaced an image at:
https://example.com/wp-content/uploads/website-banner.jpg

You can purge that specific URL, provided it is the URL actually requested by visitors.
If you changed a homepage that is cached as HTML, purge the homepage URL as well.
Cloudflare also provides a Purge Everything option for broader troubleshooting.
However, clearing the entire cache can temporarily reduce performance because previously cached resources may need to be fetched again.
If your website uses several caching layers, clearing Cloudflare alone may not solve the issue. Cloudflare may simply retrieve an outdated response from the origin server and cache it again.
A useful troubleshooting order is to ensure that the origin server has the correct content, purge the relevant server-side cache, and then purge the affected Cloudflare cache entries.
Cloudflare’s documentation explains the available cache invalidation methods:
https://developers.cloudflare.com/cache/guides/invalidate-cache/
9. Why Does Cloudflare Keep Showing the Old Page After Purging?
Sometimes website owners purge the Cloudflare cache but the old content continues appearing.
There are several possible explanations.
First, the hosting server itself may still be serving outdated HTML. When Cloudflare requests the page again, it receives the old version from the origin.
Second, the wrong URL may have been purged. A website can have different cache entries for URL variations, query strings, or other cache-key components, depending on its configuration.
Third, the content may be generated by a WordPress plugin, page builder, or application component that maintains its own internal cache.
Fourth, the browser may still be using previously stored CSS, JavaScript, or image resources.
Finally, the page may not have been cached by Cloudflare in the first place.
To investigate, examine the HTTP response headers.
Cloudflare responses may contain a CF-Cache-Status header that indicates how Cloudflare handled caching for a request.
For example, a response may include:
CF-Cache-Status: HIT
This generally indicates that Cloudflare served the response from its cache.
A response containing:
CF-Cache-Status: MISS
Indicates that the requested response was not found in the applicable Cloudflare cache and Cloudflare fetched it from the origin.
Other values, including BYPASS, DYNAMIC, REVALIDATED, or EXPIRED, provide additional information about caching behavior.
Interpret these values in the context of the actual request and your Cloudflare configuration.
A cache MISS does not guarantee that the response contains the latest WordPress content. The origin server may still be returning an outdated page from its own cache.
10. Check HTTP Cache-Control Headers
HTTP caching behavior is influenced by response headers sent by the web server or application.
One important header is Cache-Control.
For example:
Cache-Control: public, max-age=3600
This tells compatible caches that the response may be stored and treated as fresh for up to 3,600 seconds, or one hour, subject to other applicable caching rules.
Another example is:
Cache-Control: no-cache
Despite its name, no-cache does not necessarily prevent storage. It instructs compliant caches to validate a stored response before reusing it.
If you want to prohibit storing a response, the appropriate directive is generally:
Cache-Control: no-store
For logged-in administrative pages, account information, and other sensitive personalized responses, caching policies require particular care.
Website owners should not apply the same long cache lifetime indiscriminately to all pages.
Static images, versioned CSS files, and JavaScript resources can often benefit from longer caching periods.
Frequently updated HTML pages may require shorter lifetimes or explicit revalidation.
WordPress administration pages, shopping carts, checkout pages, and personalized account pages generally require appropriate cache exclusions or private caching policies.
Incorrect Cache-Control settings can result in outdated content or, in more serious situations, inappropriate caching of personalized information.
For additional background, see the HTTP caching documentation:
https://developer.mozilla.org/en-US/docs/Web/HTTP/Guides/Caching
11. Use Browser Developer Tools to Identify Cached Content
Browser Developer Tools can help determine whether outdated content is coming from the browser, a CDN, or another caching layer.
In Chrome, Edge, or Firefox, press F12 to open Developer Tools.
Select the Network tab and reload the affected page.
Click the main page request and inspect its response headers.
Look for information such as:
Cache-Control: max-age=3600
Age: 1200
CF-Cache-Status: HIT
ETag: "example-version"
Last-Modified: ...
The Age header, when present, generally reports the estimated age of a response within a cache.
The ETag and Last-Modified headers can help browsers and caches determine whether stored content needs to be updated.
A server may respond with HTTP 304 Not Modified when a conditional request determines that a stored representation remains valid.
In the Network tab, you may also find a Disable cache option.
In Chromium-based browsers, this option can help test requests without relying on the normal browser cache while Developer Tools remains open.
This feature does not disable caching at Cloudflare or at your hosting server.
Developer Tools are especially valuable when only CSS files, JavaScript, or images appear outdated while the HTML page itself is correct.
12. Check Whether CSS or JavaScript Files Are Still Cached
Sometimes the website’s text has updated correctly, but its appearance remains unchanged.
For example, you edit your theme’s CSS file to change a background color, button style, or font size.
The new CSS file exists on the server, but the browser continues loading a previously cached version.
This happens because browsers and CDNs may cache static files for extended periods.
If the resource URL does not change, a cache may continue reusing its existing copy until its freshness lifetime expires or revalidation occurs.
A common solution is cache busting, which involves changing the resource URL when its contents change.
For example, an existing stylesheet might be requested as:
https://example.com/wp-content/themes/mytheme/style.css?ver=1.0
After an update, the URL could become:
https://example.com/wp-content/themes/mytheme/style.css?ver=1.1
Because the URL has changed, caches that distinguish these URLs can request the updated stylesheet.
An alternative is to use a content hash or version identifier in the filename.
For WordPress themes and plugins, CSS and JavaScript files should generally be registered and enqueued using the appropriate WordPress functions, with a meaningful version value.
For example, wp_enqueue_style() supports a version parameter that can be changed when a stylesheet is updated.
Avoid manually editing WordPress core files to implement cache busting.
If a page builder generates CSS files, use its built-in regenerate CSS, clear files, or cache management function when available.
Purging the browser cache alone may temporarily fix a stale stylesheet, but proper asset versioning provides a more reliable long-term solution.
13. Why Is My Website Still Showing an Old Image?
Outdated images are among the most common caching problems.
Suppose you replace a website banner with a new image but upload it using the same filename.
The new file may exist on the server, yet visitors continue seeing the previous image because the URL has not changed.
For example:
https://example.com/images/banner.jpg
If the browser or CDN already cached this URL, it may continue using the old image while the stored response remains fresh.
One straightforward solution is to upload the replacement image with a different filename.
For example:
https://example.com/images/banner-2026.jpg
Then update the WordPress page, theme setting, or CSS reference to use the new URL.
Because this is a different resource URL, it avoids reliance on invalidating the previous image cache entry.
You can also purge the exact old image URL from your CDN and clear relevant browser caches.
If WordPress generates multiple image sizes, remember that changing an original image does not necessarily update every previously generated thumbnail.
Your WordPress theme or page builder may be using a resized image rather than the original file.
Check the actual image URL displayed in the browser to determine which file is being loaded.
14. Check WordPress Page Builders and Generated Files
Many WordPress websites use page builders or visual design systems that generate their own files and cached data.
Examples include Elementor and other visual page-building tools.
Some page builders generate CSS files based on design settings. When you change colors, fonts, margins, or layouts, the builder may need to regenerate these files.
If a page looks correct inside the editor but appears outdated to visitors, check the page builder’s tools and maintenance settings.
Look for options related to clearing cache, regenerating CSS, rebuilding files, or synchronizing generated resources.
After completing the operation, clear any related WordPress page cache and CDN cache.
Test the public page in a logged-out browser session.
If the problem affects only one page or one design element, investigate the corresponding page builder settings rather than clearing every cache repeatedly.
15. Are You Seeing the Updated Website Only When Logged In?
A particularly confusing situation occurs when administrators see updated content, but ordinary visitors see an older version.
This is often related to full-page caching.
Many WordPress caching systems bypass page caching for logged-in administrators because administrative users may need to see personalized or dynamically generated content.
Visitors who are not logged in may receive a cached HTML page instead.
As a result, the same URL can appear different depending on the visitor’s login state.
To test this possibility, log out of WordPress and visit the page again.
You can also use a private browsing window or another device.
If the updated content appears only when logged in, inspect the page cache and CDN configuration for anonymous visitors.
Do not assume that a page is publicly updated simply because it looks correct while you are logged in to WordPress.
For content publishing workflows, testing the public view is an important final step.
16. Check DNS After Moving Your Website to Another Server
Caching is not the only reason a website might display old content.
If you recently moved your website to a different hosting server, some visitors may still be connecting to the previous server.
For example, suppose your original website was hosted at one IP address, and you migrated the site to a new server with a different IP address.
You updated the domain’s DNS records to point to the new server.
However, DNS resolvers may temporarily retain previously cached DNS answers until their time-to-live values expire.
During this transition, some visitors may reach the old server while others reach the new one.
Both servers might still contain a working copy of the website, making the issue look like an ordinary page caching problem.
To investigate, check the current DNS records for your domain.
On Windows, open Command Prompt and run:
nslookup example.com
Replace example.com with your actual domain name.
You can also query a particular DNS resolver, such as:
nslookup example.com 1.1.1.1
Compare the returned address with the expected hosting configuration.
Remember that DNS responses may be affected by proxies, CDNs, load balancers, and the queried resolver.
If your domain uses Cloudflare’s proxied DNS records, the returned IP address will normally be a Cloudflare address rather than the origin server’s IP.
Also check both A records and AAAA records when IPv6 is enabled.
If the old server is still accessible, do not immediately delete it after migration. First verify that the new server is functioning correctly and that the intended DNS configuration has taken effect.
17. Check Whether You Updated the Correct Hosting Server
Another common migration-related problem is editing files on the wrong server.
This can happen when a domain has been moved but the website owner still connects to the previous hosting account through FTP or an old control panel.
For example, you edit index.php or a WordPress theme file on the old server, while the public domain now points to the new server.
The changes are saved successfully, but the public website never reflects them because they were applied to the wrong installation.
A similar situation can occur when a developer updates a staging website instead of the production website.
To troubleshoot, identify the authoritative production environment.
Check the domain’s DNS configuration, hosting account, document root, and WordPress installation path.
Confirm that the database and files you are editing belong to the website actually serving public requests.
For websites using deployment systems, containers, or multiple application servers, ensure that the changes were deployed to the correct environment and all relevant instances.
Do not assume that successful FTP access means you are connected to the currently active website.
18. Check Multiple Servers and Load Balancers
Some websites use multiple web servers behind a load balancer.
This architecture improves availability and can help distribute visitor traffic.
However, if application files are not synchronized properly, different servers may contain different versions of the website.
For example, Server A may contain the new homepage while Server B still has the previous version.
A visitor who reaches Server A sees the updated content. Another visitor directed to Server B sees the old content.
The result may appear random.
Refreshing the browser sometimes displays the new version, while another refresh returns the old one.
This is not necessarily a browser caching issue.
Website administrators should verify that all application instances use the intended deployment version and that shared content, databases, and caches are correctly configured.
For container-based systems, confirm that older containers or application instances are not still receiving traffic.
A load balancer does not automatically synchronize WordPress files or database changes between servers.
19. Check WordPress Object Caching
WordPress object caching is different from full-page caching.
Full-page caching stores generated HTML responses. Object caching stores application data that WordPress or its plugins may reuse during PHP execution.
Persistent object caching solutions such as Redis or Memcached can reduce repeated database operations and improve performance.
However, incorrectly managed object caches may contribute to stale application data.
If the HTML page cache has been cleared but WordPress continues generating outdated content, check whether persistent object caching is enabled.
Some WordPress hosting platforms provide a Flush Object Cache function.
Use the relevant management interface to clear stored objects when necessary.
Be aware that flushing an object cache can temporarily increase database load as cached values are rebuilt.
If multiple WordPress installations share a Redis or Memcached service, confirm that the cache uses appropriate isolation or key prefixes.
Do not flush the entire shared cache service without understanding which applications depend on it.
Object cache problems are less common than ordinary browser and full-page caching issues, but they are worth investigating when simpler troubleshooting steps fail.
20. Check Apache and Nginx Caching Settings
Advanced hosting environments may configure caching directly through the web server or reverse proxy.
Apache can send browser caching directives using modules such as mod_expires and mod_headers.
For example, an Apache configuration might contain:
ExpiresActive On
ExpiresByType text/css "access plus 1 month"
This tells compatible caches that CSS responses may remain fresh for a specified period.
However, Apache must have the appropriate module enabled, and the configuration must be used in an allowed context.
Similarly, Nginx can set caching headers and may provide its own caching mechanisms.
For example:
expires 30d;
Depending on its configuration context, this directive can set expiration behavior for the responses it controls.
These settings can improve performance for stable resources but may contribute to outdated content when frequently modified files retain the same URLs.
For WordPress websites, avoid applying long caching periods indiscriminately to dynamic HTML.
If you use Apache .htaccess rules to control caching, verify that the rules are valid and supported by your hosting environment.
An incorrect .htaccess directive can result in an HTTP 500 Internal Server Error.
Nginx does not process Apache .htaccess files, so Nginx caching configuration must be managed through its own configuration system or hosting platform.
21. Why Does Clearing the Cache Sometimes Make the Problem Return?
Clearing a cache removes or invalidates stored responses, but it does not always correct the configuration that caused the problem.
For example, suppose your CDN cache is purged while the origin server still contains outdated HTML in its page cache.
The next visitor requests the page, and the CDN retrieves the outdated response from the origin.
The CDN may then store that outdated response again.
The website appears to return to the old version even though the CDN cache was successfully cleared.
Another possibility is that a cache plugin fails to invalidate related pages.
For example, publishing a new post may require refreshing not only the post itself but also the homepage, category archive, tag archive, and other pages that display the new content.
If those related pages are not invalidated, visitors may see inconsistent information.
The long-term solution is to identify which cache layer holds the stale response and configure the appropriate invalidation behavior.
Repeatedly using Purge Everything after every small edit is usually unnecessary and can reduce the performance benefits of caching.
22. Recommended Troubleshooting Order
When a website continues displaying outdated content, use a consistent troubleshooting process rather than changing multiple settings at once.
Step 1: Verify the content. Confirm that the correct page, post, image, or theme file was actually updated and published.
Step 2: Test the browser. Perform a hard refresh and open the website in a private browsing window.
Step 3: Test the public view. Compare the page while logged in and logged out of WordPress.
Step 4: Clear the WordPress page cache. Use the installed caching plugin’s appropriate purge function.
Step 5: Check the hosting cache. Determine whether your hosting provider uses LiteSpeed, Nginx, Varnish, or another server-side caching system.
Step 6: Purge the CDN cache. If the website uses Cloudflare or another CDN, purge the affected cached URLs after confirming the origin has the correct version.
Step 7: Inspect static files. If only the website’s appearance or images remain outdated, investigate CSS, JavaScript, images, and asset versioning.
Step 8: Verify DNS and hosting. If the website recently migrated, confirm that visitors are reaching the intended server.
Step 9: Inspect advanced caches. If necessary, investigate object caching, application instances, reverse proxies, and custom HTTP caching rules.
Step 10: Review response headers. Use Developer Tools or command-line HTTP diagnostics to identify which layer may be returning outdated resources.
After each step, test the affected URL before continuing. This helps isolate the source of the problem and avoids unnecessary changes.
23. How to Prevent Outdated Website Content in the Future
Caching is an important part of website performance, and disabling all caching is generally not the best solution.
Instead, configure caching to match the type of content being delivered.
For static assets such as images, CSS, JavaScript, and fonts, longer cache lifetimes can be appropriate when filenames or URLs change whenever the underlying content changes.
For frequently updated HTML pages, choose suitable cache lifetimes and ensure that publishing changes triggers the appropriate invalidation process.
For WordPress websites, use caching solutions that can invalidate affected pages and related archives after content updates.
If you use a CDN, understand how its caching rules interact with origin server headers and WordPress caching plugins.
Avoid overlapping caching systems unless you understand how each layer handles expiration and invalidation.
For administrative pages, checkout pages, account pages, and other personalized content, configure caching policies that protect private information and preserve correct application behavior.
If you manage multiple websites, document the caching setup for each domain. Record which plugin, hosting cache, and CDN services are active.
Finally, test significant updates as an ordinary visitor rather than relying entirely on what you see inside the WordPress administration dashboard.
A good caching configuration should improve performance without requiring manual intervention after every routine website update.
24. Frequently Asked Questions
Why does my website show old content even after I click Update in WordPress?
The updated content may be saved correctly, but a browser, WordPress caching plugin, hosting cache, or CDN may still be serving an earlier version. Start by confirming the public URL and clearing the relevant page cache.
Why does my website look updated on my computer but old on another device?
The devices may have different cached resources, cookies, or network paths. They may also reach different CDN cache locations or servers. Compare the HTTP responses to identify the difference.
Does clearing the browser cache clear the Cloudflare cache?
No. Browser caching and Cloudflare caching are separate systems. Clearing the browser cache does not remove cached resources stored on Cloudflare’s edge servers.
Does Cloudflare cache WordPress pages automatically?
Cloudflare commonly caches eligible static resources by default. Caching ordinary HTML pages generally requires an appropriate cache configuration or supported feature.
Why does my new CSS not appear?
The browser or CDN may still be using an older stylesheet. Clear the relevant cache, verify the requested CSS URL, and use asset versioning to ensure updated stylesheets can be retrieved reliably.
Why does my website work correctly when I am logged in?
Many page caching systems bypass caching for logged-in administrators. Logged-out visitors may still receive older cached HTML. Always test the public website separately.
Does DNS caching cause old website content?
DNS caching does not directly store website HTML. However, after a hosting migration, cached DNS answers may direct some visitors to an older server that still contains the previous website.
Should I disable all caching on my WordPress website?
Usually not. Caching improves performance and reduces server load. It is generally better to configure caching correctly, use appropriate expiration policies, and purge affected content when necessary.
Is it safe to use Cloudflare Purge Everything?
It is a supported cache management action, but clearing the entire cache may temporarily increase origin server traffic and reduce caching efficiency. Purging specific affected URLs is usually more appropriate for routine updates.
What is the difference between browser cache and server cache?
Browser cache stores website resources locally on the visitor’s device. Server cache stores generated content or application data within the hosting infrastructure. A CDN cache stores content on distributed servers closer to visitors.
Can outdated content affect SEO?
Yes. If search engine crawlers receive outdated pages, they may continue observing older content until the updated version becomes accessible and is recrawled. Correct cache invalidation and consistent server responses help ensure that visitors and crawlers receive the intended version.
Conclusion
When a website continues showing old content after an update, caching is often the cause, but the problem can originate at several different levels.
The browser may have stored outdated files. A WordPress caching plugin may still contain an earlier HTML version. The hosting provider may operate a separate server cache, or a CDN such as Cloudflare may be delivering previously cached resources.
In other situations, the website owner may be editing the wrong server, accessing an outdated DNS destination, or using static files that have not been properly versioned.
The most effective solution is to identify where the outdated response originates and clear or correct that specific layer.
Start by verifying the published content, testing the page in another browser, and clearing the relevant WordPress cache. Then investigate hosting-level caching, Cloudflare, asset versioning, DNS, and server configuration when necessary.
Remember: clearing the cache is a troubleshooting action, but proper cache configuration is the long-term solution.
We believe reliable website performance depends on understanding how browsers, WordPress, web servers, and CDNs work together.
With a properly configured caching strategy, you can improve loading speed while ensuring visitors receive current, accurate content.