
When running a PHP website, you may occasionally encounter problems when uploading large files, importing databases, processing images, or executing scripts that require more time than usual.
For example, WordPress may display a message indicating that an uploaded file exceeds the maximum permitted size.
A PHP script may also terminate before completing a lengthy operation.
These problems are often related to PHP configuration settings such as upload_max_filesize, post_max_size, max_execution_time, and max_input_time.
If your website runs on Apache with PHP installed as an Apache module, you may be able to modify these settings directly through an .htaccess file.
However, there is an important limitation.
Many modern hosting environments use PHP-FPM or CGI/FastCGI instead of the Apache PHP module.
In these environments, php_value directives in .htaccess generally do not work and may cause an HTTP 500 Internal Server Error.
We will explain how to configure PHP file upload limits and script execution time, when .htaccess can be used, how to configure PHP-FPM environments, and how to verify that your changes have taken effect.
What Is PHP upload_max_filesize?
The upload_max_filesize directive defines the maximum size of an individual file that PHP will accept through its standard HTTP file upload mechanism.
For example, consider the following PHP configuration:
upload_max_filesize = 20MThis setting limits an individual uploaded file to approximately 20 megabytes.
If a visitor attempts to upload a file larger than the permitted size, PHP will reject that file according to its upload handling rules.
The upload_max_filesize setting is particularly important for websites that allow users to upload images, documents, videos, or other files.
WordPress websites also depend on this setting when uploading media files through the WordPress administration interface.
However, upload_max_filesize is not the only setting that controls file uploads.
Another important directive is post_max_size.
What Is PHP post_max_size?
The post_max_size directive defines the maximum size of the entire HTTP POST request body that PHP will process.
For example:
post_max_size = 25MThis setting allows a request body of approximately 25 megabytes.
Unlike upload_max_filesize, which controls the size of an individual uploaded file, post_max_size applies to the entire POST request.
An HTTP POST request may contain an uploaded file along with other form fields and additional data.
For this reason, post_max_size should generally be larger than upload_max_filesize.
For example:
upload_max_filesize = 20M
post_max_size = 25M
This configuration allows some additional space for form data and multipart encoding overhead.
If post_max_size is smaller than upload_max_filesize, the effective upload capability may be limited by the smaller POST request limit.
When an incoming POST request exceeds post_max_size, PHP may leave the $_POST and $_FILES arrays empty.
Remember that these limits apply to PHP request processing. A web server, reverse proxy, CDN, or application may enforce additional restrictions.
What Is PHP max_execution_time?
The max_execution_time directive defines the maximum execution time allowed for a PHP script, expressed in seconds.
For example:
max_execution_time = 30This setting specifies a limit of 30 seconds.
If a PHP script exceeds its applicable execution-time limit, PHP may terminate the script and report a fatal error.
A typical error message is:
Fatal error: Maximum execution time of 30 seconds exceededThis problem may occur during operations such as large database imports, image processing, report generation, or complex application tasks.
However, max_execution_time does not necessarily measure the total wall-clock duration of an HTTP request.
On Unix-like operating systems, time spent waiting for certain system operations, database queries, or network operations generally does not count toward the PHP script execution-time limit.
Other systems and runtime configurations may behave differently.
In addition, PHP-FPM, Apache, Nginx, reverse proxies, and hosting platforms may enforce their own request timeouts.
Increasing max_execution_time does not automatically override these other limits.
What Is PHP max_input_time?
The max_input_time directive controls the maximum time PHP is allowed to spend parsing incoming request data.
This includes receiving and processing input associated with file uploads.
For example:
max_input_time = 120This configuration allows up to 120 seconds for input processing under the applicable PHP runtime rules.
If visitors upload large files over slow connections, a low max_input_time setting may cause problems even when upload_max_filesize is sufficiently large.
It is important to understand the difference between max_input_time and max_execution_time.
The max_input_time setting relates to request input processing, while max_execution_time relates to script execution.
Increasing max_execution_time alone may not solve a file upload timeout caused by input processing.
Step 1: Identify How PHP Runs on Your Server
Before modifying any PHP configuration, determine how PHP is executed by your hosting environment.
Apache can run PHP through several different mechanisms.
One traditional approach is mod_php, which embeds PHP into Apache as a module.
Other common approaches include PHP-FPM, CGI, and FastCGI.
The distinction is important because php_value directives in .htaccess are supported by the Apache PHP module, but they are not processed by PHP-FPM in the same way.
On a compatible Apache mod_php installation, a directive such as:
php_value upload_max_filesize 20Mmay work inside .htaccess.
However, if your website runs PHP-FPM, adding this directive may cause Apache to reject the configuration.
Many modern shared hosting environments, including some cPanel installations, use PHP-FPM or another external PHP handler.
Therefore, do not assume that your hosting account supports php_value simply because the web server uses Apache.
If you have access to a hosting control panel, look for information about the active PHP handler.
Alternatively, ask your hosting provider whether PHP runs as an Apache module or through PHP-FPM.
You can also inspect the Server API information in PHP configuration diagnostics, but avoid leaving detailed diagnostic pages publicly accessible.
Step 2: Locate Your .htaccess File
If your hosting environment supports Apache mod_php and allows PHP configuration overrides, locate your website’s .htaccess file.
Log in to your hosting account using cPanel File Manager, SFTP, or SSH.
Navigate to the website’s document root, commonly named public_html for the primary domain.
Look for a file named .htaccess.
Because filenames beginning with a dot may be hidden, enable the option to display hidden files if necessary.
If the file already exists, download a backup before making changes.
WordPress and other PHP applications may use .htaccess for redirects, URL rewriting, authentication, and other configuration rules.
Do not remove existing application directives.
If no .htaccess file exists, you may create one, provided your hosting environment supports Apache per-directory configuration.
Remember that the PHP settings described in the following methods work through .htaccess only when the server uses a compatible PHP handler and permits the directives.
Method 1: Change the PHP Upload File Size Limit
On an Apache server running compatible mod_php, you can use the php_value directive to change upload_max_filesize.
For example, add:
php_value upload_max_filesize 20MThis sets the PHP maximum individual upload size to 20 megabytes.
If you want to permit files up to 50 megabytes, use:
php_value upload_max_filesize 50MHowever, increasing upload_max_filesize alone may not be sufficient.
You should also configure post_max_size to allow the entire HTTP request body.
For example:
php_value upload_max_filesize 50M
php_value post_max_size 60M
This allows individual uploads up to approximately 50 megabytes, while permitting additional space for the complete POST request.
The values should be selected according to your website’s actual needs and the hosting provider’s resource restrictions.
Do not increase upload limits unnecessarily, especially for websites that accept files from untrusted visitors.
Larger upload limits may increase resource consumption and create additional security considerations.
Method 2: Change PHP Maximum Execution Time
If a PHP script requires more time to complete, you may be able to increase max_execution_time using .htaccess.
For example:
php_value max_execution_time 120This requests a PHP script execution-time limit of 120 seconds.
You could also configure:
php_value max_execution_time 300This specifies 300 seconds, or five minutes.
However, increasing the limit does not guarantee that a long-running script will finish successfully.
The web server, PHP-FPM process manager, reverse proxy, or hosting provider may enforce a shorter timeout.
Also, some PHP operations may be better performed as background jobs or command-line tasks rather than through long-running browser requests.
For example, a large database import is often more reliable when executed through an appropriate command-line tool instead of a PHP webpage.
Use higher execution-time limits only when justified by the application’s requirements.
Method 3: Change PHP Maximum Input Time
Large file uploads may require additional input processing time.
On a compatible mod_php installation, add:
php_value max_input_time 120This requests a maximum input processing time of 120 seconds.
For larger uploads or slower network connections, the application may require a higher value.
For example:
php_value max_input_time 300This allows up to 300 seconds under the applicable PHP input-time rules.
However, the hosting platform may enforce additional connection or request timeouts.
If uploads still fail after changing max_input_time, check upload_max_filesize, post_max_size, application upload limits, and any reverse proxy restrictions.
Method 4: Configure PHP Memory Limit
Some PHP operations require significant memory, especially image manipulation, large data processing tasks, and complex application operations.
PHP provides the memory_limit directive to control memory consumption.
For example:
php_value memory_limit 256MThis requests a per-script PHP memory limit of 256 megabytes.
However, the memory_limit directive is not the same as upload_max_filesize.
A 100 MB uploaded file does not necessarily require exactly 100 MB of PHP memory.
Memory usage depends on how the application processes the file.
For example, decoding and manipulating a compressed image can require substantially more memory than the size of the original image file.
Similarly, an application that reads an entire uploaded file into memory may require additional resources.
Increasing memory_limit should therefore be based on the application’s actual processing requirements rather than the upload file size alone.
Hosting providers may also impose resource limits that cannot be overridden through .htaccess.
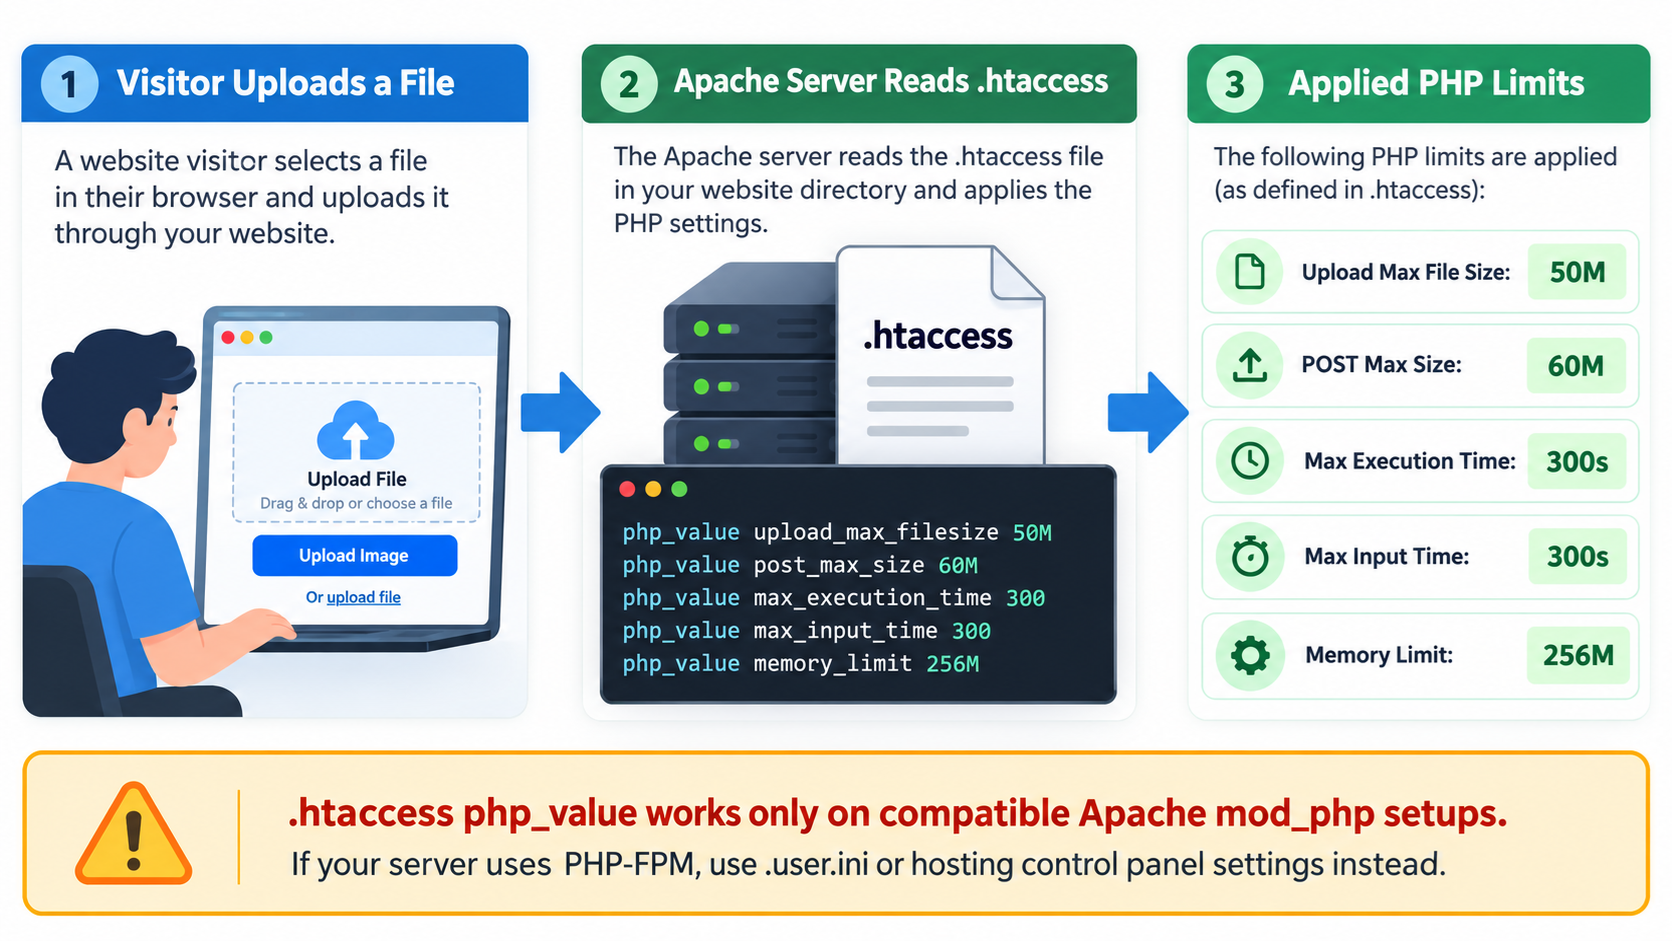
Method 5: Configure Multiple PHP Limits Together
If your Apache server uses mod_php and permits the necessary overrides, you can configure several PHP settings in the same .htaccess file.
For example:
php_value upload_max_filesize 50M
php_value post_max_size 60M
php_value max_execution_time 300
php_value max_input_time 300
php_value memory_limit 256M
This configuration requests the following PHP limits.
The maximum size of an individual uploaded file is 50 MB.
The maximum PHP POST request size is 60 MB.
The maximum PHP script execution time is 300 seconds.
The maximum PHP input processing time is 300 seconds.
The PHP memory limit is 256 MB.
These are example settings, not universal recommendations.
Use only the values necessary for your application.
Most importantly, do not add these directives to .htaccess unless you have confirmed that the hosting environment supports them.
On PHP-FPM installations, use the alternative configuration methods described below.
Method 6: Configure PHP Limits Using .user.ini
Many modern hosting providers run PHP through PHP-FPM or CGI/FastCGI.
In these environments, PHP supports a per-directory configuration mechanism using a file named .user.ini, provided that the feature is enabled.
Unlike .htaccess, which is processed by Apache, .user.ini is interpreted by PHP’s CGI/FastCGI configuration mechanism.
To use this method, log in to your hosting account and locate the document root of your website.
Create or edit a file named .user.ini.
Add the following configuration:
upload_max_filesize = 50M
post_max_size = 60M
max_execution_time = 300
max_input_time = 300
memory_limit = 256M
Save the file.
If supported, PHP will apply these settings according to its per-directory configuration rules.
Changes to .user.ini may not become effective immediately because PHP caches the configuration for a period of time.
The default user_ini.cache_ttl value is 300 seconds, although the hosting provider may use a different setting.
Some hosting providers also disable .user.ini processing or enforce administrative values that users cannot override.
If the values do not change, inspect the active PHP configuration or contact your hosting provider.
Because .user.ini can contain configuration information, ensure that your web server is configured not to serve its contents directly to visitors.
Method 7: Change PHP Settings Using cPanel
If your website uses cPanel, you may have access to a graphical interface for modifying PHP configuration.
Depending on the hosting provider, look for MultiPHP INI Editor, PHP Selector, or another PHP configuration feature.
For example, in a cPanel environment that provides MultiPHP INI Editor, select the appropriate domain and review the available PHP settings.
You may be able to change:
upload_max_filesize
post_max_size
max_execution_time
max_input_time
memory_limit
Save your changes after entering the desired values.
The exact options depend on the hosting provider and the active PHP handler.
Some providers restrict certain settings, while others allow them to be changed directly through the control panel.
For most shared hosting users, the hosting provider’s supported PHP configuration interface is generally safer than manually adding php_value directives to .htaccess.
It also reduces the risk of introducing an incompatible Apache configuration.
Method 8: Change PHP Settings in php.ini
If you manage your own VPS or dedicated server, you may prefer to modify the PHP configuration directly.
PHP configuration is commonly stored in a file named php.ini.
Its location depends on the operating system, PHP version, and execution method.
For example, a Linux installation might use a path similar to:
/etc/php/8.x/fpm/php.iniThe exact PHP version and directory name will vary.
Apache mod_php and PHP-FPM may use different php.ini files, even on the same server.
Open the configuration file used by the PHP runtime serving your website and locate the relevant directives.
For example:
upload_max_filesize = 50M
post_max_size = 60M
max_execution_time = 300
max_input_time = 300
memory_limit = 256M
After saving the changes, reload or restart the appropriate PHP service according to your server configuration.
For PHP-FPM, this usually involves the relevant PHP-FPM service rather than the Apache PHP module.
Use the correct service name for your Linux distribution and installed PHP version.
Before modifying a production server, create a configuration backup and verify that the settings are appropriate for the applications hosted on the server.
How to Check Your Current PHP Limits
After changing PHP configuration settings, verify that the intended values are active.
One option is to create a temporary PHP diagnostic script.
For example:
<?php
echo 'Upload Max: ' . ini_get('upload_max_filesize') . "\n";
echo 'Post Max: ' . ini_get('post_max_size') . "\n";
echo 'Execution Time: ' . ini_get('max_execution_time') . "\n";
echo 'Input Time: ' . ini_get('max_input_time') . "\n";
echo 'Memory Limit: ' . ini_get('memory_limit') . "\n";
Save the script as a temporary PHP file in a suitable testing location.
When executed through the same web PHP runtime as your website, it displays the active values.
For example, the output might be:
Upload Max: 50M
Post Max: 60M
Execution Time: 300
Input Time: 300
Memory Limit: 256M
This is an example of expected output, not a guarantee that the configuration has been applied.
You can also use PHP’s phpinfo() function to examine configuration details, including the active PHP handler and loaded configuration files.
However, phpinfo() can expose detailed server information.
Do not leave PHP diagnostic scripts publicly accessible on a production website. Remove them immediately after testing.
If you use WordPress, the Site Health information screen may also display useful server and PHP configuration values.
Remember that the PHP command-line interface may use a different configuration from the PHP runtime serving your website.
Therefore, checking php.ini values from an SSH terminal does not always confirm the limits used by browser-based PHP requests.
Common Problem: 500 Internal Server Error
One of the most common problems occurs when a website owner copies php_value directives into .htaccess without checking the PHP execution method.
For example:
php_value upload_max_filesize 50MThis directive may work when PHP runs as an Apache module.
However, it is generally unsupported when PHP runs through PHP-FPM or CGI/FastCGI.
Apache may return an HTTP 500 Internal Server Error after encountering an unrecognized or unauthorized directive.
If your website stops working immediately after adding php_value settings, restore the previous .htaccess file.
Then confirm whether PHP uses mod_php or PHP-FPM.
If PHP-FPM is active, use a supported method such as .user.ini, the hosting provider’s PHP configuration interface, or PHP-FPM configuration managed by the server administrator.
Do not attempt to solve the error by repeatedly adding different php_value directives.
The correct solution is to use the configuration mechanism supported by the PHP runtime.
Common Problem: Upload Size Still Does Not Increase
Sometimes a website continues reporting the old upload limit even after PHP settings have been modified.
Several factors may explain this behavior.
First, confirm that upload_max_filesize and post_max_size are both configured correctly.
The POST request limit should be larger than the individual upload limit to allow room for form data.
Second, verify that your changes are being applied to the PHP runtime actually serving the website.
Some hosting accounts have multiple PHP versions or separate configuration files.
Third, check whether your hosting provider enforces administrator-level limits.
Certain PHP settings cannot be overridden when the provider has locked them through higher-priority configuration.
Fourth, inspect other components in the request path.
For example, Nginx may enforce a request-body size limit through client_max_body_size.
Apache can also enforce request-body limits through LimitRequestBody.
A reverse proxy, CDN, web application firewall, or application-specific upload component may impose additional restrictions.
Increasing PHP upload_max_filesize does not override these independent limits.
Finally, some applications have their own file upload restrictions that must be configured separately.
Common Problem: PHP Script Still Times Out
Increasing max_execution_time does not always prevent request timeouts.
A PHP application may be affected by several different time limits.
PHP’s max_execution_time controls script execution according to the runtime’s rules.
PHP-FPM can impose a request termination timeout through its pool configuration.
Apache and Nginx may impose their own connection, proxy, or request timeouts.
A hosting provider may also enforce maximum resource consumption policies.
For example, a PHP script configured with max_execution_time = 300 may still be terminated earlier by a PHP-FPM or reverse proxy timeout.
If a long-running operation consistently fails after a particular duration, inspect the relevant PHP, web server, and application logs.
For demanding tasks such as large imports, exports, and batch processing, consider using scheduled background jobs or command-line tools when your hosting environment supports them.
Increasing timeouts should not replace appropriate application design.
Important Security Considerations
Allowing larger uploads and longer-running PHP scripts can be useful, but it can also increase resource consumption.
Large uploads require bandwidth, disk space, temporary storage, and potentially significant application processing resources.
Long-running scripts may tie up PHP workers and affect website responsiveness.
For these reasons, do not increase limits unnecessarily.
If your website accepts files from visitors, validate uploaded files carefully.
Check file types, enforce application-level upload size restrictions, and store uploaded files in appropriate locations.
Do not trust the filename or MIME type supplied by the visitor.
Where practical, prevent uploaded files from being executed as server-side scripts.
Use authentication and authorization to control who can upload files, and consider appropriate rate limits.
Remember that increasing upload_max_filesize does not make a file upload feature secure.
File upload security depends on the entire application design, not just PHP configuration values.
Best Practices for PHP Upload and Execution Limits
Begin by identifying the actual requirements of your application.
If your website only allows small images and documents, there may be no reason to permit uploads of several hundred megabytes.
Choose upload_max_filesize according to the largest individual file your application legitimately needs to accept.
Set post_max_size high enough to accommodate the total request size, including any additional form fields and multiple uploaded files.
Adjust max_input_time when request input processing requires more time, especially when supporting larger uploads or slow network connections.
Increase max_execution_time only when application operations justify the additional time.
Use an appropriate memory_limit for the workload rather than assuming that upload size and memory requirements are identical.
Confirm whether PHP uses mod_php, PHP-FPM, or another execution mechanism before choosing a configuration method.
On shared hosting, prefer the provider’s supported PHP configuration interface.
On VPS and dedicated servers, manage PHP settings through the appropriate PHP configuration files or PHP-FPM pool configuration.
After making changes, verify the effective values through the web PHP runtime and test an actual upload or processing task.
Finally, monitor server logs and resource usage to ensure the new limits do not create additional performance problems.
A Practical Configuration Example
Suppose you manage a PHP website that needs to accept files up to 50 MB and occasionally performs operations requiring several minutes of PHP execution time.
A possible starting configuration is:
upload_max_filesize = 50M
post_max_size = 60M
max_execution_time = 300
max_input_time = 300
memory_limit = 256M
If your website uses Apache mod_php and permits the relevant .htaccess overrides, the equivalent configuration is:
php_value upload_max_filesize 50M
php_value post_max_size 60M
php_value max_execution_time 300
php_value max_input_time 300
php_value memory_limit 256M
Use the php_value version only on a confirmed, compatible Apache mod_php installation.
If your website uses PHP-FPM or CGI/FastCGI and supports .user.ini, use the first configuration format inside the .user.ini file instead.
These settings are examples. They do not override higher-priority PHP configuration values, web server upload restrictions, or hosting provider limits.
The best values depend on your application’s workload and available server resources.
Conclusion
PHP provides several configuration directives for controlling file upload sizes, HTTP request sizes, script execution time, and input processing time.
The upload_max_filesize directive controls the maximum size of an individual uploaded file.
The post_max_size directive limits the overall POST request size.
The max_execution_time directive limits PHP script execution time, while max_input_time controls the time allowed for request input processing.
On Apache servers using mod_php, these settings may be changed through .htaccess with php_value directives when the server permits them.
However, many modern hosting environments use PHP-FPM, where php_value directives in .htaccess generally do not work.
For PHP-FPM environments, use a supported .user.ini file, the hosting provider’s PHP configuration interface, or server-level PHP configuration.
Always verify your active PHP execution method before making changes.
Also, remember that PHP limits are only part of the complete request-processing system.
Web servers, reverse proxies, CDNs, and hosting providers may enforce additional limits.