
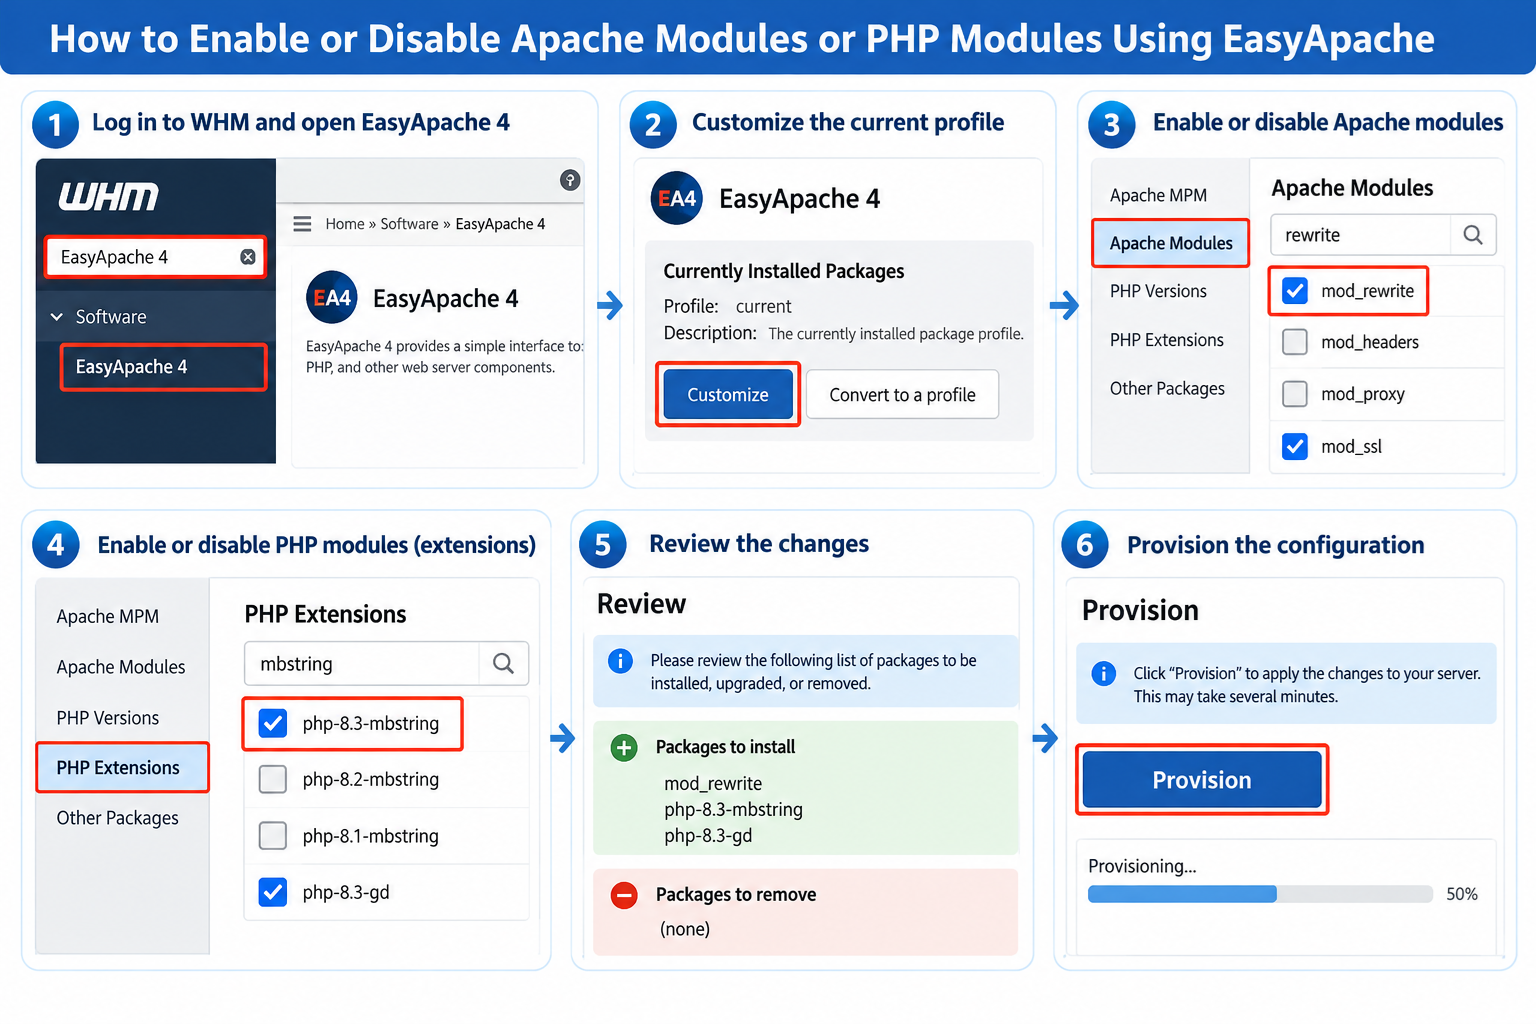
EasyApache is a tool included with cPanel & WHM that allows server administrators to manage Apache, PHP versions, PHP extensions, and related web server components without manually compiling everything from the command line.
On modern cPanel servers, this is generally done through EasyApache 4.
If you manage a Linux dedicated server or VPS with WHM and root access, EasyApache can make it much easier to enable or disable Apache modules and PHP modules.
However, changing these components can affect every website on the server, so you should understand what a module does before enabling, disabling, installing, or removing it.
What Is EasyApache?
EasyApache is cPanel’s system for managing the Apache and PHP software stack.
It allows administrators to choose which web server components are installed on the server.
Depending on your server configuration, EasyApache can be used to manage:
Apache
Apache modules
PHP versions
PHP extensions
PHP-related packages
Web server dependencies
Other packages associated with the cPanel web stack
Instead of manually downloading source code and compiling Apache or PHP, you can select packages through WHM and let EasyApache manage the installation.
EasyApache 4
Current cPanel systems use EasyApache 4.
EasyApache 4 is package-based, meaning that Apache, PHP, and their modules are installed through operating-system packages rather than being completely rebuilt every time a change is made.
This makes upgrades and configuration changes easier to manage than older versions of EasyApache.
If you see documentation referring to EasyApache 3, be aware that it describes an older system and should not be followed on a modern cPanel server.
What Is an Apache Module?
Apache modules add features to the Apache web server.
Apache itself handles HTTP requests, but modules provide additional functionality.
Examples may include modules for URL rewriting, SSL/TLS support, compression, proxying, headers, authentication, caching, and other web server functions.
For example, mod_rewrite provides URL rewriting capabilities that are commonly used by WordPress and many other web applications.
Another example is mod_headers, which allows Apache to modify HTTP response headers.
The exact modules available depend on your operating system, cPanel version, and EasyApache repository.
What Is a PHP Module?
The term PHP module is often used to describe a PHP extension.
PHP extensions add additional functionality to PHP.
For example, PHP may require extensions to communicate with databases, process images, handle XML, work with compressed files, or perform other specialized tasks.
Common PHP extensions include:
mysqli
pdo_mysql
curl
mbstring
gd
intl
zip
xml
soap
opcache
The PHP extensions required by a website depend on the software running on that website.
WordPress, for example, commonly uses several PHP extensions, while other applications may have different requirements.
Before You Change Apache or PHP Modules
Before changing EasyApache packages, it is a good idea to know why you are making the change.
Do not enable every available module simply because it is listed.
Each installed component can increase complexity and may create additional maintenance or security considerations.
Likewise, do not disable a module simply because you do not recognize its name.
A website, plugin, control panel feature, or server service may depend on it.
If the server hosts production websites, make sure you have a current backup before making major changes.
How to Open EasyApache 4
Log in to WHM as root or as an administrator with sufficient privileges.
In the WHM search box, type:
EasyApache 4
Then open:
Software → EasyApache 4
You should see information about the currently installed EasyApache profile.
The interface normally allows you to customize the current configuration or select another available profile.
For most existing servers, you should customize the current profile rather than replacing it blindly.
Customize the Current EasyApache Profile
Inside EasyApache 4, locate the currently installed package configuration.
Choose the option to customize the profile.
EasyApache will guide you through several sections.
Depending on the cPanel version and server configuration, these sections may include Apache, PHP versions, PHP extensions, and other packages.
You can review your selections before EasyApache actually changes the server.
This review step is important because it shows which packages will be installed, upgraded, downgraded, or removed.
How to Enable an Apache Module
Open WHM and go to:
Software → EasyApache 4
Customize the currently installed profile.
Open the Apache Modules section.
You should see a list of available Apache modules.
Use the search function if you already know the module name.
For example, you might search for:
mod_headers
or:
mod_proxy
Locate the module you want and enable it.
Continue through the EasyApache configuration until you reach the Review section.
Check the proposed changes carefully.
If everything is correct, provision the configuration.
EasyApache will install the selected package and make the necessary server changes.
How to Disable an Apache Module
The process for disabling an Apache module is similar.
Open:
WHM → Software → EasyApache 4
Customize the currently installed profile.
Open the Apache Modules section.
Find the module you want to remove or disable.
Turn off the selection for that module.
Continue to the Review section.
EasyApache should show that the corresponding package will be removed.
Review the dependencies carefully before proceeding.
Then provision the configuration.
If another installed component requires that Apache module, EasyApache may warn you or require related packages to be changed as well.
Be Careful with Apache Dependencies
Apache modules are not always independent.
One module may depend on another package or component.
Removing a module may therefore cause additional packages to be removed.
This is why the EasyApache Review screen is important.
Do not simply click Provision without checking the package changes.
If EasyApache plans to remove something you did not expect, stop and investigate before continuing.
How to Enable a PHP Version
EasyApache 4 can also manage multiple PHP versions.
Open:
WHM → Software → EasyApache 4
Customize the current profile.
Open the PHP Versions section.
You may see PHP versions such as:
PHP 8.1
PHP 8.2
PHP 8.3
PHP 8.4
The exact versions available depend on your current cPanel repositories and support status.
Choose the PHP version you want to install.
Continue through the configuration and provision the changes.
Installing a PHP version does not necessarily mean every website will automatically start using it.
Individual domains may still use different PHP versions depending on MultiPHP Manager configuration.
How to Enable a PHP Module or Extension
To install a PHP extension, open:
WHM → Software → EasyApache 4
Customize your current profile.
Go to the PHP Extensions section.
Search for the extension you need.
For example, if an application requires mbstring, search for:
mbstring
You may see separate packages for different PHP versions.
For example, a server supporting several PHP versions may have different mbstring packages for PHP 8.2 and PHP 8.3.
Enable the extension for the PHP version that your website actually uses.
Continue to the Review page.
Verify the packages that EasyApache plans to install.
Then provision the configuration.
PHP Extensions Are Usually Version-Specific
This is an important point.
Installing a PHP extension for one PHP version does not necessarily install it for every PHP version.
For example, if a website uses PHP 8.3, installing the corresponding extension only for PHP 8.2 will not help that website.
Before installing an extension, check which PHP version the domain uses.
You can do this through:
WHM → Software → MultiPHP Manager
or through the customer’s cPanel interface if the server allows users to manage PHP versions.
Once you know the correct PHP version, install the extension for that version.
How to Disable a PHP Extension
To remove a PHP extension, return to:
WHM → Software → EasyApache 4
Customize the installed profile.
Open PHP Extensions.
Find the extension you want to remove.
Disable it for the relevant PHP version.
Continue to the Review screen.
EasyApache should show the corresponding package as being removed.
Review the dependency changes carefully and provision only when you are satisfied with the result.
Example: Installing mbstring
Suppose a PHP application reports that the mbstring extension is missing.
First, determine the PHP version used by the website.
Assume the website uses PHP 8.3.
Open EasyApache 4 and go to PHP Extensions.
Search for:
mbstring
Locate the package corresponding to PHP 8.3.
Enable it.
Review the changes and provision the configuration.
After the process completes, PHP 8.3 should have mbstring available.
You can then test the website again.
Example: Installing PHP cURL
Many applications use PHP cURL to make HTTP or HTTPS requests to external services.
If an application reports that the PHP cURL extension is missing, open EasyApache 4 and search the PHP Extensions section for curl.
Install the package corresponding to the PHP version used by the website.
After provisioning, restart or reload services if required by the system.
EasyApache normally handles the necessary integration automatically.
Example: Installing GD
The GD extension provides image-processing functionality for PHP.
Applications may use it to resize images, create thumbnails, or manipulate graphics.
To install it:
Open EasyApache 4.
Customize the current profile.
Open PHP Extensions.
Search for:
gd
Select the appropriate package for the required PHP version.
Review and provision the configuration.
Example: Installing ZIP Support
Some PHP applications require ZIP support to create or extract compressed archives.
In EasyApache 4, search the PHP Extensions section for:
zip
Install the appropriate extension for the PHP version your application uses.
WordPress plugins, backup tools, and content-management systems sometimes require this functionality.
How to Check Whether a PHP Extension Is Installed
If you have SSH access, you can check installed PHP modules from the command line.
For example:
php -m
This displays PHP modules available to the default command-line PHP environment.
You can search for a specific extension:
php -m | grep mbstring
or:
php -m | grep curl
If the module appears in the output, it is enabled for that PHP environment.
However, be careful: the command-line PHP version may not be the same PHP version used by a particular website.
Check a Specific cPanel PHP Version
cPanel EasyApache PHP binaries are often installed separately for each version.
For example, depending on the server configuration, you may have binaries associated with a particular EasyApache PHP package.
Because paths and package names can vary, it is usually easier for beginners to verify extensions through WHM or a PHP information page associated with the website.
If using command-line verification, make sure you are checking the same PHP version that the domain uses.
Using phpinfo()
Another way to inspect PHP configuration is with PHP’s phpinfo() function.
A temporary PHP file containing phpinfo() can display information about the active PHP environment, including loaded extensions.
However, phpinfo() exposes detailed server information.
If you create such a file for troubleshooting, remove it when you are finished.
Do not leave a publicly accessible phpinfo page on a production website unnecessarily.
How to Check Apache Modules from SSH
Administrators with SSH access can also inspect loaded Apache modules.
The exact command depends on the operating system and cPanel configuration.
On some Apache systems, commands such as the following may list loaded modules:
httpd -M
or:
apachectl -M
The correct executable may vary.
EasyApache should remain the preferred management method on a cPanel server because manually changing package-managed files can conflict with cPanel’s configuration system.
Do Not Manually Compile Apache Modules on a cPanel Server Unless Necessary
One of the advantages of EasyApache is package management.
Installing Apache or PHP modules manually outside EasyApache can create compatibility problems.
A future cPanel update may replace files, break dependencies, or conflict with manually installed components.
Whenever an appropriate EasyApache package exists, it is generally better to use EasyApache rather than manually compiling the module.
Advanced administrators may sometimes need custom components, but this requires additional maintenance.
Apache Modules and Server Security
Every additional server component increases the amount of software you must maintain.
You should therefore install only modules that you actually need.
Unused modules may increase complexity or potentially expose additional functionality that attackers can target if vulnerabilities are discovered.
Keep cPanel, Apache, PHP, and installed packages updated.
Removing genuinely unused modules can simplify the environment, but always confirm that no website or server feature depends on them before removal.
PHP Extensions and Website Compatibility
A website may fail after changing PHP extensions.
For example, an application may depend on an extension that was removed.
A PHP application might display an error such as:
Call to undefined function
or report that a required PHP extension is unavailable.
If a problem appears immediately after an EasyApache change, review the extensions you removed or changed.
Restoring the required extension may resolve the issue.
PHP Versions Matter
Many PHP compatibility problems are caused not by a missing module but by using the wrong PHP version.
An older application might work with PHP 7.x but fail with PHP 8.x.
A newer application may require PHP 8.1 or later.
Before changing PHP modules, verify both the application’s required PHP version and its required extensions.
Upgrading PHP without testing applications can cause website failures.
MultiPHP Manager and EasyApache Are Different
EasyApache installs PHP versions and extensions on the server.
MultiPHP Manager determines which installed PHP version a particular domain uses.
For example, EasyApache might install PHP 8.2 and PHP 8.3.
MultiPHP Manager can then configure:
site1.com → PHP 8.2
site2.com → PHP 8.3
The two tools work together but perform different jobs.
If PHP 8.3 is not installed through EasyApache, MultiPHP Manager cannot assign PHP 8.3 to a website.
MultiPHP INI Editor Is Also Different
MultiPHP INI Editor controls PHP configuration values.
It can change settings such as:
memory_limit
upload_max_filesize
post_max_size
max_execution_time
These are PHP configuration directives.
They are different from PHP extensions.
If you need to install curl, mbstring, gd, zip, or another PHP extension, use EasyApache rather than MultiPHP INI Editor.
What Happens During Provisioning?
When you click Provision in EasyApache, WHM calculates the required package changes.
It may install new packages, remove selected packages, update dependencies, and adjust the server’s web stack.
The process may restart or reload Apache and related services.
Websites can sometimes experience a brief interruption while services are restarted.
For this reason, major EasyApache changes on an important production server are best performed during a suitable maintenance period.
Always Review the Changes Before Provisioning
The Review screen may be the most important part of EasyApache.
It shows what will change.
You may see sections indicating:
Packages to install
Packages to upgrade
Packages to remove
Packages that will remain unchanged
Pay special attention to packages marked for removal.
If you expected to remove one small extension but EasyApache wants to remove several important packages, do not continue until you understand why.
Can EasyApache Break a Website?
Yes, if you remove something the website needs or change the server environment incompatibly.
For example, removing a required PHP extension can break an application.
Removing or changing an Apache module may affect .htaccess rules, authentication, compression, proxying, or other functionality.
Changing the PHP version may expose compatibility problems in older code.
EasyApache itself is designed to manage packages safely, but it cannot determine every requirement of every application hosted on your server.
The administrator must still understand the impact of the configuration change.
Make a Backup Before Major Changes
Before performing major web stack changes, make sure important websites and server data are backed up.
A good backup can help you recover if an unexpected compatibility problem occurs.
For a production hosting server, you should already have a regular backup system rather than creating backups only before EasyApache changes.
Still, confirming that recent backups are available before major maintenance is a good practice.
Test Important Websites After Changes
After provisioning EasyApache changes, test your important websites.
Open the home page.
Test login systems.
Check WordPress administration pages if applicable.
Test contact forms.
Verify applications that depend on databases or external APIs.
Check HTTPS.
If the server hosts email-related web applications, verify those as well.
A web page loading successfully does not necessarily mean every application feature works.
Check Apache After Changes
After a major Apache module change, confirm that Apache is running correctly.
From WHM, you can review service status.
Administrators with SSH access can also inspect service status using system tools.
For example, depending on the operating system:
systemctl status httpd
Do not restart services repeatedly without understanding why they are failing.
If Apache does not start, review its error messages and configuration.
Check PHP After Changes
If you add or remove PHP extensions, confirm that PHP applications still work.
You can use:
php -m
for basic command-line inspection.
You can also review PHP errors in website logs.
If your server supports multiple PHP versions, verify the version used by the affected website rather than relying only on the default system PHP command.
What If the Module You Need Is Not Listed?
Not every Apache or PHP module is available through EasyApache.
If a module does not appear, first confirm that you are searching for the correct package or extension name.
The module may also be unavailable for the particular PHP version you are using.
Some third-party extensions must be installed using other supported methods.
Before manually installing anything, check cPanel documentation and compatibility information.
Installing unsupported packages manually can complicate future server upgrades.
PECL PHP Extensions
Some PHP extensions are distributed through PECL rather than the standard EasyApache package selection.
PECL stands for PHP Extension Community Library.
Depending on the extension and cPanel environment, installation may require a different workflow from standard EasyApache PHP extensions.
Because compatibility varies by PHP version and extension, always verify that the extension supports the PHP version installed on your server.
Do Not Remove Modules Only to Save Memory
It may be tempting to disable large numbers of modules in an attempt to make the server faster.
In practice, removing necessary modules can create more problems than benefits.
Server performance depends on many factors, including memory, CPU resources, PHP configuration, PHP-FPM, database performance, caching, traffic, and application efficiency.
Only remove a module when you know it is unnecessary or when you have a specific technical reason.
EasyApache and PHP-FPM
PHP-FPM is a method of running PHP that can improve process management and performance for many hosting environments.
EasyApache can install PHP components needed by PHP-FPM, while other WHM interfaces control whether PHP-FPM is enabled for individual domains.
Do not confuse PHP-FPM with a PHP extension.
PHP-FPM changes how PHP processes are managed.
Extensions such as curl, mbstring, and gd add functions to PHP itself.
EasyApache and WordPress
WordPress normally depends on several standard PHP features and may benefit from additional extensions depending on plugins and themes.
If WordPress Site Health reports that a recommended or required PHP extension is missing, EasyApache is often the appropriate place to install that extension on a cPanel server.
Before installing it, verify which PHP version the WordPress site uses.
Then install the matching extension for that PHP version.
EasyApache and Hosting Providers
If you have a shared hosting account, you normally cannot use EasyApache yourself.
EasyApache requires server-level administrative privileges.
Your hosting provider manages it.
If a required PHP extension is unavailable on shared hosting, you may need to contact the hosting provider and ask whether they can enable it.
If you operate your own dedicated server or VPS with root WHM access, you can normally manage EasyApache directly.
Root Access Is Important
Full EasyApache management generally requires root-level WHM access.
A normal cPanel user cannot install arbitrary server-wide Apache modules.
A reseller with limited WHM access may also be unable to modify EasyApache.
This restriction exists because EasyApache changes can affect every account hosted on the server.
A Simple EasyApache Workflow
The safest way to think about EasyApache is:
Identify exactly what your application requires.
Determine the PHP version or Apache component involved.
Open WHM and EasyApache 4.
Customize the current profile.
Find the required module or extension.
Enable or disable only what you intend to change.
Review the package changes.
Provision the configuration.
Test the affected websites afterward.
This approach is safer than making several unrelated changes at the same time.
Example: A WordPress Site Says mbstring Is Missing
Suppose WordPress or a plugin reports that mbstring is missing.
First, open MultiPHP Manager and determine which PHP version the domain uses.
Assume the domain uses PHP 8.3.
Next, open EasyApache 4.
Customize the current profile.
Go to PHP Extensions.
Search for mbstring.
Enable the PHP 8.3 mbstring package.
Review the changes.
Provision the configuration.
Finally, return to the website and confirm that the warning has disappeared.
This illustrates how EasyApache and MultiPHP Manager work together.
Example: An Application Needs mod_headers
Suppose an application requires Apache’s headers functionality.
Open EasyApache 4 and customize the current profile.
Go to Apache Modules.
Search for the headers module.
Enable the appropriate module if it is available and not already installed.
Review the package changes and provision the configuration.
Then test the application’s header-related functionality.
Do not enable unrelated Apache modules at the same time unless you specifically need them.
EasyApache in Simple Terms
EasyApache is the cPanel and WHM tool used to build and maintain your server’s web software environment.
Apache modules extend Apache.
PHP extensions extend PHP.
EasyApache allows root administrators to install or remove many of these components from a graphical WHM interface.
MultiPHP Manager chooses which installed PHP version a domain uses.
MultiPHP INI Editor changes PHP configuration values.
Understanding these differences makes cPanel server administration much easier.
Conclusion
EasyApache 4 provides a convenient way to enable or disable Apache modules and PHP extensions on a cPanel & WHM server.
To manage an Apache module, open WHM, go to EasyApache 4, customize the current profile, and review the Apache Modules section.
To manage a PHP extension, use the PHP Extensions section and make sure you select the extension for the PHP version actually used by your website.
Always review the proposed package changes before provisioning.
Do not remove unfamiliar modules without checking their purpose, and test important websites after making changes.
EasyApache makes web stack management much easier, but the changes it makes are server-wide and can affect multiple websites.
A careful, one-change-at-a-time approach is the safest way to use it.