
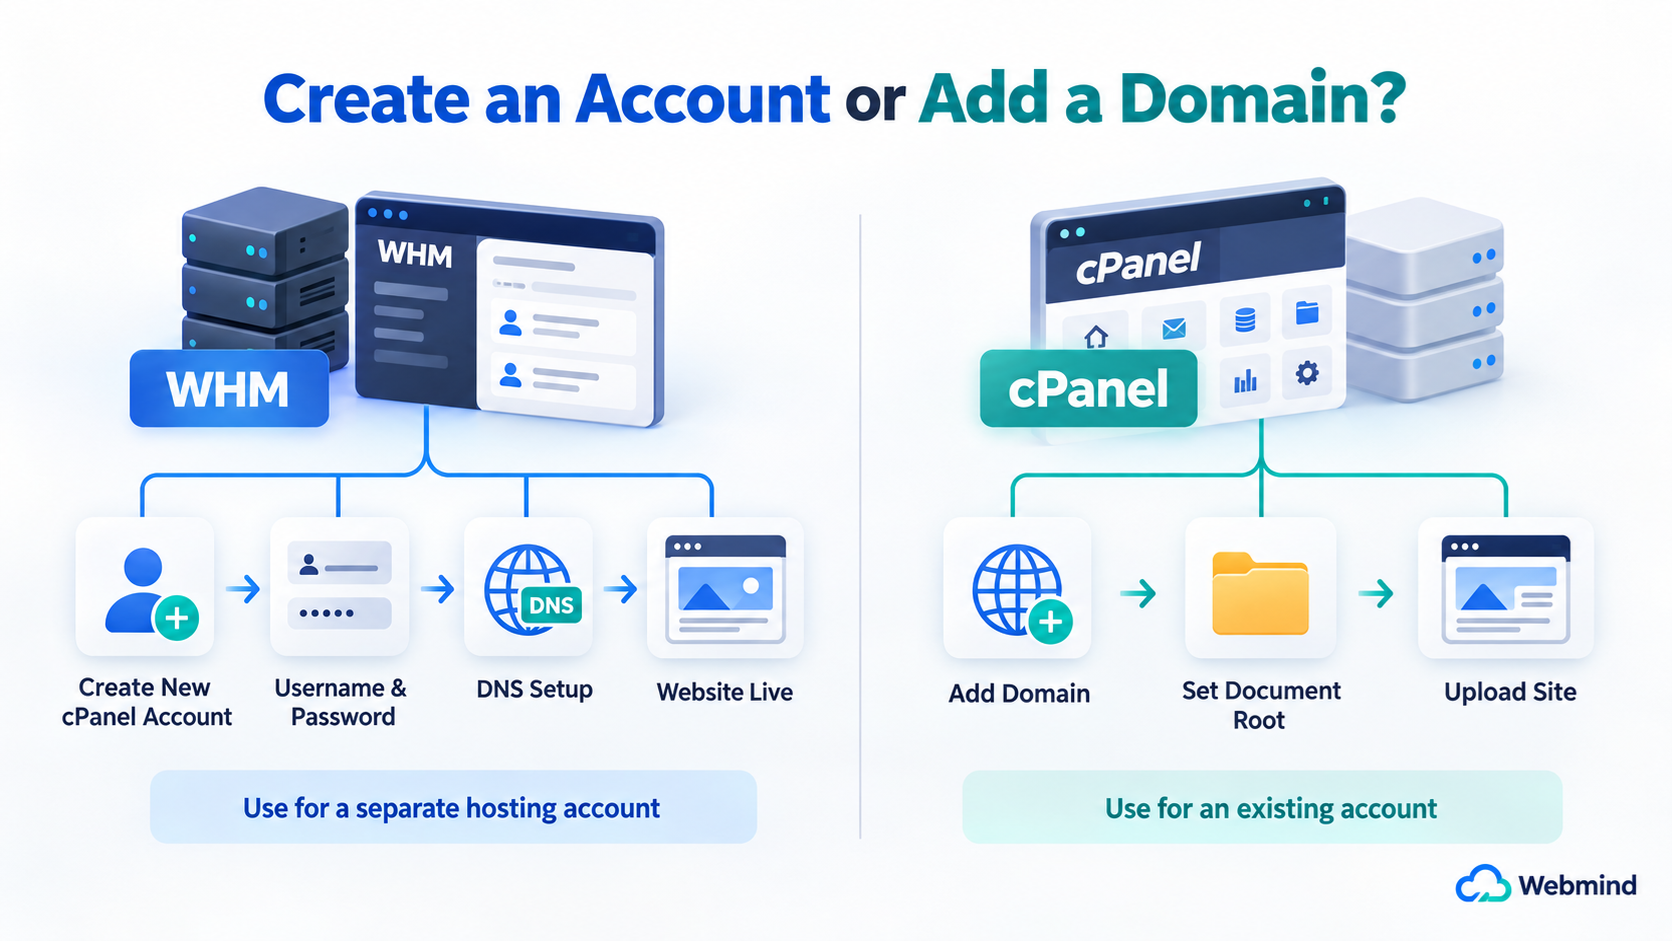
If you manage a web hosting server with cPanel and WebHost Manager, commonly called WHM, one of the most common administrative tasks is adding a new website or hosting customer.
However, there are two different ways to do this, and beginners sometimes confuse them.
You can create an entirely new cPanel account through WHM, or you can add another domain to an existing cPanel account.
The correct method depends on whether the new domain should have its own hosting account, login, files, email accounts, databases, and resource limits, or whether it should simply become another website inside an existing hosting account.
This guide explains both methods and the important differences between them.
What Is WHM?
WHM stands for WebHost Manager. It is the server and hosting-account management interface used with cPanel.
A server administrator or reseller normally uses WHM to create, modify, suspend, and remove cPanel hosting accounts. WHM can also be used to manage hosting packages, DNS settings, server configuration, SSL-related features, and many other administrative functions.
A normal website owner usually works mainly inside cPanel, while the hosting provider or server administrator works mainly inside WHM.
Think of WHM as the control center for hosting accounts, while cPanel is the control panel for an individual hosting account.
What Is a cPanel Account?
A cPanel account is an individual hosting environment on a cPanel server.
A typical cPanel account has its own username, home directory, website files, email configuration, databases, domains, and other hosting settings.
For example, suppose a hosting company has three customers:
example1.com
example2.com
example3.com
The hosting provider could create three separate cPanel accounts in WHM, giving each customer an independent login and hosting environment.
This is normally the preferred approach when the websites belong to different customers or need to be managed independently.
Creating a New cPanel Account in WHM
If you want a domain to have its own independent cPanel account, create the account through WHM.
Log in to WHM using an administrator or reseller account that has permission to create hosting accounts.
From the WHM dashboard, navigate to:
WHM → Account Functions → Create a New Account
This opens the account creation page.
Step 1: Enter the Domain Name
In the Domain field, enter the primary domain name that will be associated with the new hosting account.
For example:
example.com
Normally, you should enter the domain without adding http://, https://, or a directory path.
The domain does not necessarily have to be registered through the same company that provides the hosting. A domain registered somewhere else can normally be hosted on the cPanel server as long as its DNS is configured correctly.
Current versions of cPanel & WHM may also allow a new account to use a temporary cPanel domain before the customer’s registered domain is ready. A temporary domain is mainly useful for building or previewing a website before DNS is pointed to the server.
Step 2: Choose the cPanel Username
WHM normally suggests a username automatically based on the domain name.
You can keep the suggested username or enter another valid username.
The username identifies the hosting account on the server and is also commonly used as part of file paths, database names, and other server resources.
Choose the username carefully because changing a hosting account username later can affect related server configuration.
Step 3: Create a Strong Password
Enter a strong password for the new cPanel account.
You can also use WHM’s password generator if it is available.
A strong hosting password is especially important because access to cPanel may provide access to website files, databases, email accounts, DNS settings, backups, and other sensitive information.
Do not use simple passwords based on the domain name, company name, username, or other easily guessed information.
Step 4: Enter the Contact Email Address
Enter an email address for the owner or administrator of the account.
This address can be used for account notifications and other hosting-related messages.
Whenever possible, use an email address that does not depend entirely on the website you are creating. For example, if the website itself experiences a problem, an external email address may still be available to receive important notifications.
Step 5: Select a Hosting Package
If you have already created hosting packages in WHM, you can select one for the account.
A hosting package is a predefined collection of limits and features.
Depending on the server configuration, a package might control resources such as disk space, bandwidth, email accounts, databases, domains, or other hosting features.
Hosting companies commonly create packages such as:
Basic Hosting
Business Hosting
WordPress Hosting
Premium Hosting
Using packages makes account management easier because multiple customers can share a consistent set of hosting limits.
If you operate your own server and do not need predefined packages, WHM may allow you to configure account settings individually.
Step 6: Review DNS Settings
WHM also provides DNS-related options during account creation.
In many normal configurations, the server automatically creates a DNS zone for the new domain when the account is created.
However, creating the DNS zone on the server does not automatically mean that internet users will reach that server.
The domain must use the correct authoritative nameservers or have DNS records pointing to the hosting server.
For example, if your hosting server provides nameservers such as:
ns1.yourhostingcompany.com
ns2.yourhostingcompany.com
the domain may need to be configured at its registrar to use those nameservers.
Alternatively, if DNS is managed by another provider such as the domain registrar or an external DNS service, the necessary A, AAAA, CNAME, MX, and other records should be configured there instead.
Do not change nameservers blindly. First determine where the domain’s authoritative DNS is supposed to be managed.
Step 7: Review Mail Routing
WHM may also provide email routing options.
The correct choice depends on where email for the domain is hosted.
If the cPanel server handles the domain’s email, the server normally needs to treat the domain as local mail.
If email is handled by an outside service, such as Microsoft 365 or Google Workspace, the DNS and mail-routing configuration needs to match that service.
Incorrect mail routing can cause incoming mail to be delivered to the wrong server or fail completely.
If you are unsure, avoid changing an existing working email configuration until you know where the domain’s MX records point.
Step 8: Create the Account
After reviewing the settings, click Create.
WHM will create the cPanel account and configure the necessary hosting environment.
The process normally creates the user’s home directory and basic hosting configuration, and the account becomes available in WHM.
After creation, WHM provides confirmation information for the new account.
You can then enter the account’s cPanel interface and begin configuring the website.
Where Are the Website Files Stored?
For a traditional primary domain configuration, the public website files are commonly located under a directory such as:
/home/username/public_html/
The exact arrangement can vary depending on the account and domain configuration.
A typical website might contain files such as:
index.html
index.php
wp-config.php
.htaccess
and directories containing images, scripts, WordPress files, or other website content.
The server’s web software uses the domain configuration to determine which directory should be served when someone visits the domain.
Pointing the Domain to the New Account
Creating the account in WHM is only one part of putting the website online.
The domain must also resolve to the correct server.
There are generally two common approaches.
The first is to change the domain’s nameservers so that DNS is handled by the cPanel server or the hosting provider’s DNS infrastructure.
The second is to keep DNS somewhere else and update the necessary DNS records to point to the hosting server.
For a traditional IPv4 website, this commonly includes an A record pointing the domain to the server’s IPv4 address.
If IPv6 is being used, an AAAA record may also be configured.
The exact DNS configuration depends on your hosting environment.
DNS Changes May Take Time
When DNS records or nameservers are changed, the new information may not appear everywhere immediately.
DNS resolvers can keep previously retrieved records in cache until their Time To Live, or TTL, expires.
Because of caching, one device may reach the new server while another device temporarily continues reaching the old server.
This does not necessarily mean that the hosting account was configured incorrectly.
SSL Certificate Setup
After the domain points correctly to the hosting server, the website should also have a valid SSL certificate so visitors can use HTTPS.
Modern cPanel servers often use AutoSSL to request and install certificates automatically when the account and domain meet the necessary requirements.
If AutoSSL is enabled for the account and the server can validate the domain correctly, cPanel can usually install a certificate after the domain has been configured.
If SSL installation fails, one of the first things to check is whether the domain’s DNS actually points to the correct server.
Creating Another Domain Inside an Existing cPanel Account
You do not always need to create a completely new cPanel account for every domain.
If one customer owns several websites and wants to manage them from the same cPanel account, another domain may be added inside the existing cPanel account.
Log in to cPanel and find the Domains section.
Open:
cPanel → Domains
Then choose the option to create a new domain.
Enter the domain name you want to add.
Depending on the configuration and cPanel version, you may also be able to choose the directory that will contain the new website.
For example, one account could host:
example.com
example.net
mysecondsite.com
The domains may use different document roots and display completely different websites even though they are managed through the same cPanel account.
What Is a Document Root?
A document root is the directory containing the files that a web server publishes for a particular domain.
For example, suppose mysecondsite.com uses a directory similar to:
/home/username/mysecondsite.com/
When someone visits mysecondsite.com, the web server retrieves the website files from that directory.
The exact directory structure depends on how the domain is configured.
This is why it is important to check the document root when managing multiple websites inside the same cPanel account. Uploading files to the wrong directory can cause them to appear on a different website or not appear at all.
New WHM Account or Additional cPanel Domain?
The most important decision is whether the new website should have its own cPanel account.
Create a new account in WHM when the website belongs to a different customer, requires an independent login, needs separate resource limits, or should be administratively isolated from other websites.
Add the domain to an existing cPanel account when the same owner manages several related websites and does not need a completely separate hosting environment.
For a hosting company, giving unrelated customers separate cPanel accounts is generally the cleaner approach.
What Is a Domain Alias?
Sometimes you do not want a second domain to contain a separate website.
Instead, you may want another domain name to display the same website as the primary domain.
This type of configuration is commonly known as a domain alias.
For example:
example.com
example.net
could both lead visitors to the same website.
An alias is different from creating a separate website with its own document root.
What Is a Subdomain?
A subdomain adds another name in front of an existing domain.
For example:
blog.example.com
shop.example.com
support.example.com
A subdomain can point to a specific website or application while remaining part of the main domain’s namespace.
Depending on the hosting configuration, subdomains can also be managed from the Domains interface in cPanel.
Do You Need to Create the Domain in Both WHM and cPanel?
Normally, no.
If you create a completely new cPanel account in WHM using example.com as its primary domain, you generally do not need to log in to that cPanel account and add example.com again.
WHM already created the account with that primary domain.
The Domains interface inside cPanel is primarily useful when you want to add additional domains, aliases, or related domain configurations to an existing account.
Common Mistake: Creating a New Account for Every Domain
It is technically possible to create many separate cPanel accounts, but doing so may be unnecessary when several websites belong to the same owner.
Each account adds another username, password, configuration, and administrative object that must be managed.
For customers who want completely independent hosting environments, separate accounts make sense.
For several small websites belonging to the same owner, adding domains to one account may be easier.
The best structure depends on your security, billing, resource-management, and administrative requirements.
Common Mistake: Adding Different Customers to One cPanel Account
The opposite mistake can be more serious.
If multiple unrelated customers’ websites are placed inside the same cPanel account, they share the same main hosting login and much of the same hosting environment.
That makes account separation, customer access, security management, migration, suspension, and billing more difficult.
A hosting provider should generally keep independent customers in independent cPanel accounts whenever practical.
Common Mistake: Forgetting About DNS
A successful message from WHM does not automatically make the domain reachable from the internet.
The domain still needs correct DNS.
If the website does not open after creating an account, check:
The domain registration is active.
The authoritative nameservers are correct.
The domain’s A or AAAA record points to the correct server.
The DNS record has had enough time for previous cached information to expire.
The web server recognizes the domain.
The account is not suspended.
SSL configuration is working if HTTPS is being used.
Checking these items systematically is usually much more useful than repeatedly recreating the hosting account.
Common Mistake: Changing Email DNS While Moving a Website
Website hosting and email hosting do not have to be provided by the same company.
For example, a website might be hosted on a cPanel server while the company’s email is hosted by Microsoft 365 or Google Workspace.
When moving a website to a new server, changing the wrong DNS records can accidentally interrupt email.
Before changing DNS, identify which records are responsible for the website and which records are responsible for email.
In particular, be careful with MX records and mail-related TXT, SPF, DKIM, and CNAME records.
A Simple Example
Suppose you operate a hosting server and want to host a new customer whose domain is example.com.
First, log in to WHM.
Open Account Functions and choose Create a New Account.
Enter example.com as the domain.
Choose or confirm the username.
Create a strong password.
Enter the customer’s contact email address.
Select the appropriate hosting package.
Review the DNS and mail settings.
Click Create.
Next, configure example.com’s DNS so that the domain points to the hosting server.
Once DNS is correct, upload the website files or install a content management system such as WordPress.
Finally, confirm that HTTPS works and that the website and email services operate as expected.
Final Thoughts
WHM and cPanel serve different purposes when adding websites to a hosting server.
Use WHM when you need to create a completely new hosting account.
Use the Domains interface in cPanel when you need to add another domain to an account that already exists.
Remember that creating the hosting configuration is only part of the process.
The domain’s DNS must also point to the correct server, the website files must be placed in the correct document root, and HTTPS and email settings should be verified.
Once you understand the difference between a WHM account and a domain inside cPanel, managing multiple websites becomes much easier and more organized.