
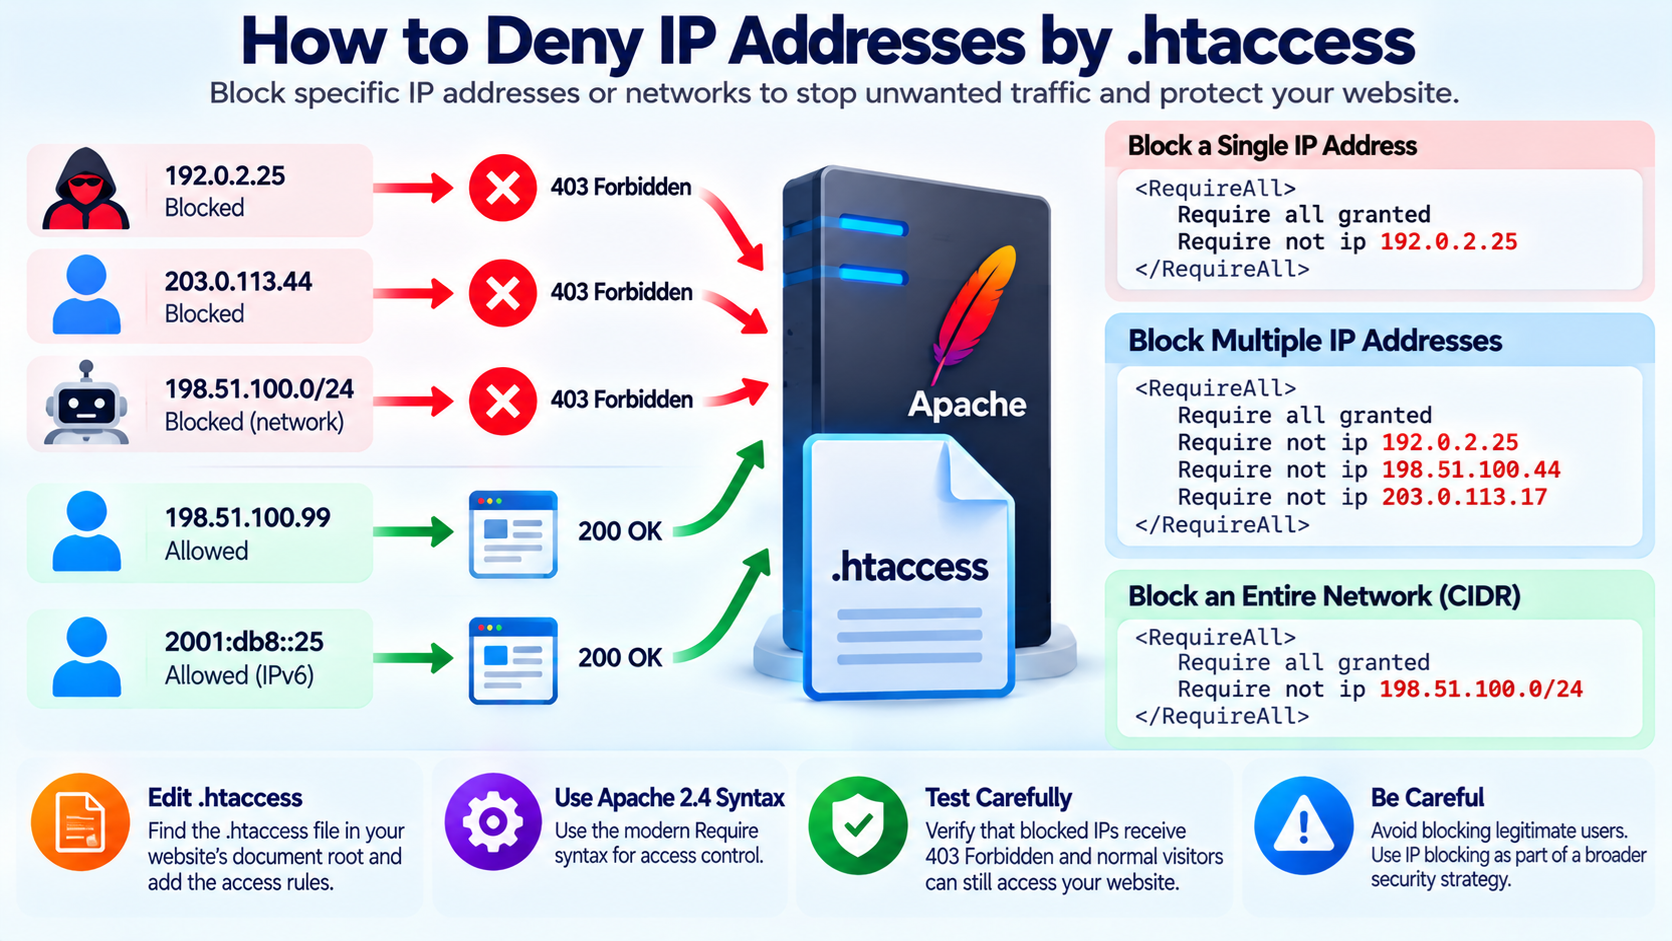
If your website is receiving unwanted traffic from a particular IP address, you may be able to block that address using the .htaccess file on an Apache web server.
This can be useful when dealing with:
Abusive visitors
Repeated login attempts
Malicious bots
Spam submissions
Scrapers
Suspicious automated requests
Known attacking IP addresses
Testing or temporary access restrictions
However, IP blocking should be used carefully.
A single IP address does not always represent a single person, and many users can share the same public IP address.
Likewise, attackers may frequently change IP addresses.
Blocking by IP can be useful, but it should normally be only one part of a broader website security strategy.
What Is .htaccess?
.htaccess is a configuration file used by Apache HTTP Server.
The name begins with a period:
.htaccess
This type of file can change how Apache handles requests inside a particular directory and, depending on the configuration, its subdirectories.
A .htaccess file may be used for things such as:
URL redirects
Rewrite rules
Access control
Custom error pages
Authentication
Security settings
Directory behavior
Website applications such as WordPress may also use .htaccess for permalink rules.
Because .htaccess can affect the behavior of your website, always make a backup before editing it.
Where Is the .htaccess File?
On many cPanel hosting accounts, the main .htaccess file is located inside:
public_html
For example:
/home/username/public_html/.htaccess
However, another domain may use a different document root.
For example:
/home/username/example.com/.htaccess
or:
/home/username/public_html/example2/.htaccess
The correct location depends on your hosting configuration.
Why Can’t I See .htaccess?
Files beginning with a period are hidden files on Linux systems.
If you use cPanel File Manager and cannot see .htaccess, enable the option to show hidden files.
In cPanel File Manager, this may be called:
Show Hidden Files
or:
Show Dotfiles
Once enabled, .htaccess should become visible if the file already exists.
Back Up .htaccess Before Editing
Before making changes, download a copy of the existing .htaccess file or create a backup.
This is especially important on WordPress websites because the file may already contain important rewrite rules.
A small syntax mistake can cause:
403 errors
500 Internal Server Errors
Broken WordPress permalinks
Redirect loops
Other website problems
Do not delete existing rules unless you understand what they do.
Apache 2.4 Uses Require
Modern Apache 2.4 uses the Require directive for access control.
Older tutorials may show:
Order Allow,Deny
Allow from all
Deny from 192.0.2.10
These older directives belong to the mod_access_compat compatibility module.
They may still work on some Apache 2.4 servers, but modern configuration should normally use the Apache 2.4 Require syntax instead. Apache still documents the older Allow, Deny, and Order directives as compatibility directives rather than the preferred authorization system.
Block One IP Address
Suppose you want to block:
192.0.2.25
A modern Apache 2.4 rule can look like this:
<RequireAll> Require all granted Require not ip 192.0.2.25 </RequireAll>
This means:
Allow everyone by default.
But do not allow requests from 192.0.2.25.
The <RequireAll> block is important because Require not cannot normally authorize a request by itself.
The positive rule:
Require all granted
allows normal visitors.
The negative rule excludes the unwanted IP address.
Block Multiple IP Addresses
You can block several addresses in the same rule.
For example:
<RequireAll> Require all granted Require not ip 192.0.2.25 Require not ip 198.51.100.44 Require not ip 203.0.113.17 </RequireAll>
Visitors from those three addresses will be denied.
Other visitors can continue accessing the site normally.
Block Multiple IPs on One Line
Apache also allows multiple IP addresses to be listed with the Require ip provider.
For clarity, however, many website administrators prefer using one address per line.
That makes the file easier to read and maintain.
For example:
<RequireAll> Require all granted Require not ip 192.0.2.25 Require not ip 198.51.100.44 Require not ip 203.0.113.17 </RequireAll>
This is easier to edit later.
Block an IPv4 Network
Sometimes you may want to block an entire network rather than one individual address.
For example:
192.0.2.0/24
A /24 IPv4 network contains addresses from:
192.0.2.0
through:
192.0.2.255
You could block the network with:
<RequireAll> Require all granted Require not ip 192.0.2.0/24 </RequireAll>
Use network-level blocks very carefully.
You may accidentally block many legitimate users.
What Does /24 Mean?
The /24 is CIDR notation.
CIDR stands for Classless Inter-Domain Routing.
In IPv4, /24 means the first 24 bits identify the network.
A /24 contains 256 IPv4 addresses.
Other common examples include:
/32 = one IPv4 address
/24 = 256 addresses
/16 = 65,536 addresses
The larger the blocked network, the greater the risk of blocking legitimate visitors.
Block an IPv6 Address
Modern websites may also receive traffic over IPv6.
For example:
2001:db8:1234::25
A rule might look like:
<RequireAll> Require all granted Require not ip 2001:db8:1234::25 </RequireAll>
Apache access control supports both IPv4 and IPv6 addressing.
Block an IPv6 Network
You can also block an IPv6 prefix.
For example:
<RequireAll> Require all granted Require not ip 2001:db8:1234::/48 </RequireAll>
Again, blocking a large IPv6 network can affect many users.
Only do this when you understand exactly which addresses are included.
Allow Only One IP Address
Sometimes you want the opposite behavior.
Instead of blocking one IP address, you may want to allow only a specific address.
For example, you could protect a development directory so only your office IP can access it.
A simple rule is:
Require ip 203.0.113.50
This means only clients matching that address are authorized.
This can be useful for:
Development websites
Private administration tools
Temporary staging sites
Internal applications
Maintenance areas
But remember that if your own IP changes, you may lock yourself out.
Allow Several IP Addresses
You can allow several addresses:
Require ip 203.0.113.50 198.51.100.22
Depending on how you organize the configuration, you may also place multiple Require ip directives inside a RequireAny block.
For example:
<RequireAny> Require ip 203.0.113.50 Require ip 198.51.100.22 </RequireAny>
Either address can then access the protected area.
Block an IP From the Entire Website
If you place an IP-blocking rule in the .htaccess file located in your website’s main document root, the rule can generally affect that directory and its descendants.
For a typical primary cPanel website, that might mean placing it inside:
public_html/.htaccess
That can block the address from most or all of the website.
The exact behavior can depend on additional Apache configuration and nested .htaccess files.
Block an IP From Only One Directory
You do not always need to block the visitor from the entire website.
Suppose you only want to protect:
/private/
You can place a separate .htaccess file inside that directory.
For example:
public_html/private/.htaccess
Then place the access rule there.
That way, the IP restriction applies only to that directory and its child paths, subject to the server configuration.
Protect wp-admin by IP
WordPress administrators sometimes want to restrict access to the administration area.
For example, you might place access controls in:
wp-admin/.htaccess
and allow only trusted IP addresses.
However, this must be done carefully.
WordPress and some plugins may rely on requests to administrative endpoints.
Restricting the entire wp-admin directory can break some functionality.
If you are not sure which endpoints your site uses, test the change carefully.
Be Careful With admin-ajax.php
WordPress commonly uses:
wp-admin/admin-ajax.php
for front-end AJAX requests.
Some themes and plugins depend on this file even for visitors who are not logged in.
If you block the entire wp-admin directory by IP, those features may stop working.
This is one reason IP restrictions around WordPress administration should be tested before using them on a production site.
Block Access to a Specific File
Apache access control can also be combined with file-level sections.
For example:
<Files “secret.php”>
Require all denied
</Files>
This blocks everyone from accessing secret.php.
Apache’s current security guidance also uses Require all denied to protect sensitive files in .htaccess or directory configuration.
Block Access to Hidden Files
Files such as:
.env
.git
.htpasswd
may contain sensitive information.
A server should normally prevent public access to such files.
For example:
<FilesMatch “^.(?!well-known)”>
Require all denied
</FilesMatch>
This type of rule can block many dotfiles while allowing the .well-known directory used by services such as certificate validation.
Do not blindly paste security rules into an existing configuration without understanding their effect.
What Happens to a Blocked Visitor?
When Apache denies access through authorization rules, the visitor will normally receive an HTTP error such as:
403 Forbidden
This means the server understood the request but refuses to provide access.
A blocked IP usually does not receive a 404 Not Found response.
What Is 403 Forbidden?
A 403 response means:
Access is forbidden.
This is different from:
404 Not Found
which means the requested resource cannot be found.
If you deliberately block a visitor using Apache access controls, a 403 response is normal.
The Older Apache Syntax
You may encounter older instructions like this:
Order Allow,Deny
Allow from all
Deny from 192.0.2.25
This syntax comes from older Apache access-control directives.
Apache 2.4 can still support these directives when the mod_access_compat module is available.
However, the modern Require syntax is preferred.
For new configurations, use Apache 2.4 rules unless your hosting provider specifically instructs you otherwise.
Do Not Mix Old and New Access Rules Carelessly
Avoid combining:
Order
Allow
Deny
with:
Require
without understanding how Apache processes the configuration.
They belong to different authorization systems.
Mixing them can create confusing behavior.
If your hosting provider uses Apache 2.4, use the modern Require system whenever possible.
How to Find an IP Address to Block
Before blocking an address, you need evidence that the IP is actually responsible for unwanted requests.
Possible sources include:
Apache access logs
cPanel Raw Access logs
Security plugin logs
Firewall logs
WordPress login logs
Web Application Firewall logs
Analytics systems
Server monitoring tools
Look at the actual request pattern rather than blocking an address simply because it appears unfamiliar.
Use cPanel Raw Access Logs
On some cPanel hosting accounts, you can access web server request logs through:
cPanel → Metrics → Raw Access
These logs may contain information such as:
Visitor IP address
Requested URL
Time
HTTP status code
Referrer
User agent
You can use this information to identify repeated abusive requests.
Check Whether the Traffic Is Actually Malicious
A large number of requests does not automatically mean an attack.
Search engines, monitoring services, uptime systems, CDNs, and legitimate crawlers may generate many requests.
Before blocking an IP, examine:
Which URLs it requests
How often it connects
Whether login attempts are failing
Whether requests target vulnerable paths
Whether the user agent is legitimate
Whether the requests cause actual problems
Blocking legitimate services can hurt your website.
Do Not Block Googlebot by Mistake
Search engine crawlers access websites from many IP addresses.
Do not block an IP simply because it requests many pages.
If you suspect Googlebot traffic, verify it using Google’s recommended crawler verification methods.
Accidentally blocking legitimate search-engine crawlers can affect indexing.
IP Addresses Can Change
A major limitation of IP blocking is that addresses can change.
Residential Internet users frequently receive dynamic IP addresses.
Mobile networks may change addresses regularly.
Attackers may use:
VPNs
Proxy servers
Cloud servers
Botnets
Compromised computers
IPv6 addresses
If you block one address, the attacker may simply return from another.
That is why IP blocking should not be your only security defense.
Many Users Can Share One IP Address
The opposite problem is also possible.
One public IP address can represent many users.
This commonly happens with:
Corporate networks
Mobile carriers
Schools
Universities
Public Wi-Fi
VPN services
Carrier-grade NAT
If you block that IP, you may block many innocent visitors.
Use broad network blocks cautiously.
Visitors Behind a CDN May Not Appear With Their Real IP
If your website uses a CDN or reverse proxy such as Cloudflare, Apache may see the proxy’s IP address instead of the visitor’s original address unless the server is configured correctly.
This is extremely important.
If you blindly block the IP seen by Apache, you might block a CDN server and affect many visitors.
Make sure your hosting environment correctly restores the original client IP before relying on IP-based .htaccess rules.
Cloudflare Users Should Consider Cloudflare Firewall Rules
If your website is behind Cloudflare, it is often more efficient to block unwanted IP addresses at Cloudflare rather than inside .htaccess.
This can stop the request before it reaches your hosting server.
Benefits can include:
Less server load
Earlier blocking
Centralized rule management
Better visibility
More flexible firewall controls
The same principle applies to other reverse proxies and Web Application Firewalls.
Server-Level Firewalls May Be Better
If you manage a VPS or dedicated server, a server-level firewall may be better than .htaccess for some blocking tasks.
For example, server administrators may use tools such as:
nftables
iptables
firewalld
CSF
Cloud firewalls
Hosting-provider firewalls
These systems can block network connections before Apache processes the request.
.htaccess blocking happens at the web server level after the connection has already reached Apache.
.htaccess Is Useful on Shared Hosting
Despite its limitations, .htaccess is useful because many shared-hosting customers do not have access to the main Apache configuration or server firewall.
They may still be allowed to control directory-level behavior through .htaccess.
Apache only honors these directives when the server configuration permits the relevant overrides. Apache’s documentation notes that AllowOverride and AllowOverrideList determine which directives may be used in .htaccess.
What If the Rule Does Not Work?
If your IP-blocking rule has no effect, there are several possible causes.
Your server may not use Apache.
Your hosting provider may disable .htaccess.
The relevant Apache module may not be enabled.
The .htaccess file may be in the wrong directory.
A CDN may be hiding the visitor’s real IP.
Another configuration may override your rule.
The address may have changed.
The request may be reaching another server.
Check your hosting environment before assuming the syntax is wrong.
Nginx Does Not Use .htaccess
This is important.
.htaccess is an Apache feature.
Nginx does not process .htaccess files.
If your website runs directly on Nginx, access rules must be configured in the Nginx server configuration or through your hosting control panel.
Some hosting systems use Nginx in front of Apache.
In that arrangement, .htaccess may still work because Apache handles part of the request.
Check with your hosting provider if you are unsure.
LiteSpeed and .htaccess
LiteSpeed Web Server is commonly used by cPanel hosting providers.
LiteSpeed supports many Apache-compatible .htaccess directives.
However, exact behavior can depend on the server and configuration.
If you use LiteSpeed and a rule does not work as expected, check the provider’s documentation or ask your hosting company.
Test After Every Change
After editing .htaccess, test:
Your homepage
WordPress administration
Important pages
Contact forms
Images
Downloads
Login pages
API endpoints
If the website suddenly returns:
500 Internal Server Error
restore the previous .htaccess file immediately.
A syntax error may be the cause.
How to Remove a Block
To unblock an IP address, remove the corresponding Require not ip line from .htaccess.
For example, if you have:
Require not ip 192.0.2.25
remove that line.
Save the file and test the website again.
Apache normally reads .htaccess dynamically, so you usually do not need to restart the server on ordinary shared hosting.
Add Comments to Your Rules
You can document why an address was blocked.
Lines beginning with # are comments.
For example:
Blocked after repeated login attacks
<RequireAll> Require all granted Require not ip 192.0.2.25 </RequireAll>
Comments can make future maintenance much easier.
Months later, you may otherwise forget why the address was blocked.
Avoid Creating Huge .htaccess Blocklists
It is technically possible to add large numbers of IP addresses to .htaccess, but this is often not the best solution.
If you are blocking hundreds or thousands of addresses, consider a more appropriate security layer such as:
A Web Application Firewall
Server firewall
Cloudflare firewall
Security service
Rate limiting
Login protection
Bot management
Very large .htaccess rule sets become difficult to maintain.
Rate Limiting May Be Better Than Blocking
Suppose an IP makes too many login attempts.
Instead of permanently blocking it, rate limiting may be more appropriate.
Rate limiting restricts how frequently requests can be made.
This can help reduce:
Brute-force attacks
API abuse
Bot traffic
Form spam
Resource exhaustion
Many WAF and CDN services provide rate-limiting features.
WordPress Security Plugins Can Help
WordPress security plugins may provide easier controls for:
Login attempt limits
Temporary IP blocking
Two-factor authentication
Malware scanning
Firewall rules
Bot detection
Security alerts
This can be easier than manually maintaining .htaccess.
However, do not install multiple overlapping security plugins without understanding how they interact.
Do Not Rely Only on IP Blocking for WordPress Login Security
Attackers can change IP addresses easily.
A stronger WordPress login strategy may include:
Strong passwords
Multi-factor authentication
Rate limiting
Web Application Firewall protection
Software updates
Limited administrator accounts
Monitoring
IP blocking can help, but it should not replace these protections.
A Practical Example
Suppose your access logs show repeated malicious requests from:
198.51.100.75
You verify that the address is repeatedly attacking your website.
If you use Apache 2.4 and .htaccess access controls are enabled, you could add:
<RequireAll> Require all granted Require not ip 198.51.100.75 </RequireAll>
Save the file.
Then test the website from a different IP address.
Requests from the blocked address should normally receive:
403 Forbidden
Other visitors should continue accessing the site.
A Practical Multiple-IP Example
Suppose you identify three abusive addresses:
198.51.100.75
203.0.113.44
192.0.2.88
You could use:
<RequireAll> Require all granted Require not ip 198.51.100.75 Require not ip 203.0.113.44 Require not ip 192.0.2.88 </RequireAll>
Keep the list documented and review it periodically.
Do not leave old blocks forever without knowing whether they are still needed.
When Should You Use .htaccess IP Blocking?
.htaccess IP blocking can be useful when:
You are on Apache shared hosting.
You have identified a specific abusive address.
You need a quick temporary block.
You want to protect a particular directory.
You do not have access to a server firewall.
You understand the effect of the rule.
It is simple and convenient for small-scale blocking.
When Should You Use Another Method?
Consider another security layer when:
You need to block thousands of IP addresses.
The attacker constantly changes addresses.
You use a CDN or reverse proxy.
You need rate limiting.
You are experiencing a DDoS attack.
You need country-level filtering.
You manage a VPS or dedicated server.
You need advanced bot protection.
In these situations, a WAF, CDN firewall, or server firewall is usually more appropriate.
Final Thoughts
You can block unwanted IP addresses from an Apache website using .htaccess.
For modern Apache 2.4 servers, use the Require authorization syntax rather than relying on old Order, Allow, and Deny examples found in older tutorials.
A typical rule looks like this:
<RequireAll> Require all granted Require not ip 192.0.2.25 </RequireAll>
This allows normal visitors while denying the specified IP address.
You can also block networks, restrict directories, or allow access only from trusted IP addresses.
However, use IP blocking carefully.
IP addresses change.
Multiple people may share one address.
CDNs may hide original visitor addresses.
Attackers can move between VPNs, proxies, cloud servers, and botnets.
For occasional abusive traffic, .htaccess can be a convenient tool.
For larger security problems, use stronger layers such as rate limiting, a Web Application Firewall, a CDN firewall, server-level filtering, multi-factor authentication, and proper website security monitoring.
The simplest rule is:
Use .htaccess for small, targeted access controls.
Use a firewall or WAF for large-scale attack protection.