
WordPress is one of the most widely used content management systems in the world.
Its popularity makes it an attractive target for automated login attempts, credential stuffing, brute-force attacks, and other unauthorized access attempts.
Two of the most important locations in a typical WordPress installation are the wp-admin directory and the wp-login.php file.
The wp-admin directory contains the WordPress administration interface, while wp-login.php handles the standard WordPress login process.
Because these locations are well known, automated bots frequently attempt to access them.
Fortunately, if your WordPress website runs on the Apache HTTP Server, you can add an additional layer of protection using the .htaccess file.
We will explain how to restrict WordPress administration access by IP address, protect the login page with an additional password, block unwanted requests, and avoid configuration mistakes that can break normal WordPress functionality.
We will also discuss the limitations of .htaccess security and explain why proper WordPress protection requires more than simply hiding the login page.
Why Should You Protect wp-admin and wp-login.php?
WordPress uses two closely related components for administration and authentication.
The first is the wp-admin directory.
For example:
https://example.com/wp-admin/
This directory contains many of the files and resources used by the WordPress administration interface.
When an authenticated administrator opens the dashboard, WordPress loads resources from this directory.
The second component is wp-login.php.
For example:
https://example.com/wp-login.php
This file handles the standard WordPress login page and participates in several authentication-related operations.
Attackers and automated bots may repeatedly send requests to the login endpoint, trying common usernames and passwords or credentials obtained from previous data breaches.
Even when these attacks are unsuccessful, repeated login attempts can consume server resources and create unnecessary activity in access logs.
Protecting these locations can reduce exposure to some automated attacks.
However, it is important to understand that wp-admin and wp-login.php are not the only possible attack surfaces on a WordPress website.
Outdated plugins, vulnerable themes, stolen administrator credentials, insecure uploads, and compromised hosting accounts can also lead to unauthorized access.
The goal is to add useful access controls without breaking legitimate WordPress operations.
Understanding the WordPress Directory Structure
Before modifying .htaccess, it helps to understand where WordPress stores its files.
A typical installation looks like this:
public_html/
.htaccess
index.php
wp-config.php
wp-login.php
wp-admin/
wp-content/
wp-includes/
The wp-admin directory is located inside the WordPress installation directory.
The wp-login.php file is located alongside wp-admin, rather than inside it.
This distinction matters because an .htaccess file placed inside wp-admin does not automatically protect wp-login.php.
For example, if your website is installed directly under public_html, you might use:
public_html/.htaccess
to control requests to wp-login.php.
You could also use:
public_html/wp-admin/.htaccess
to control access to the administration directory.
These files have different scopes.
For a WordPress installation located in a subdirectory, the paths will differ.
Always identify the actual WordPress installation location before applying access restrictions.
Before You Begin: Important Requirements
The techniques in this tutorial are intended primarily for Apache 2.4 hosting environments.
Your server must support .htaccess configuration and permit the relevant directives.
For IP restrictions and password authentication, Apache requires appropriate authorization and authentication modules.
Depending on the directive, the hosting provider must permit AuthConfig or other applicable override categories.
For URL rewriting, Apache’s mod_rewrite module and FileInfo permissions may be necessary.
Some managed WordPress providers use Nginx, LiteSpeed, reverse proxies, or specialized security systems.
Although LiteSpeed supports many Apache-compatible .htaccess rules, actual behavior can depend on the hosting environment.
Nginx does not process .htaccess files.
Before making changes, create a backup of your existing .htaccess files and confirm that you have access to cPanel File Manager, SFTP, or another recovery method.
Never rely exclusively on WordPress dashboard access to undo a rule that could lock you out of the dashboard.
Step 1: Back Up Your Existing .htaccess File
Start by locating the .htaccess file in your WordPress installation directory.
For many shared hosting accounts, the path is:
public_html/.htaccess
Because the filename begins with a period, you may need to enable hidden-file display in your hosting file manager.
Download a copy before editing it.
WordPress frequently uses .htaccess to control permalink routing.
A typical WordPress configuration contains markers such as:
# BEGIN WordPress
and:
# END WordPress
Do not delete the existing WordPress rewrite rules.
When adding your own security configuration, place it outside the automatically managed WordPress section.
WordPress and some plugins may regenerate the rules inside that section during configuration changes.
If you need to restore your website, you can replace the modified file with your backup.
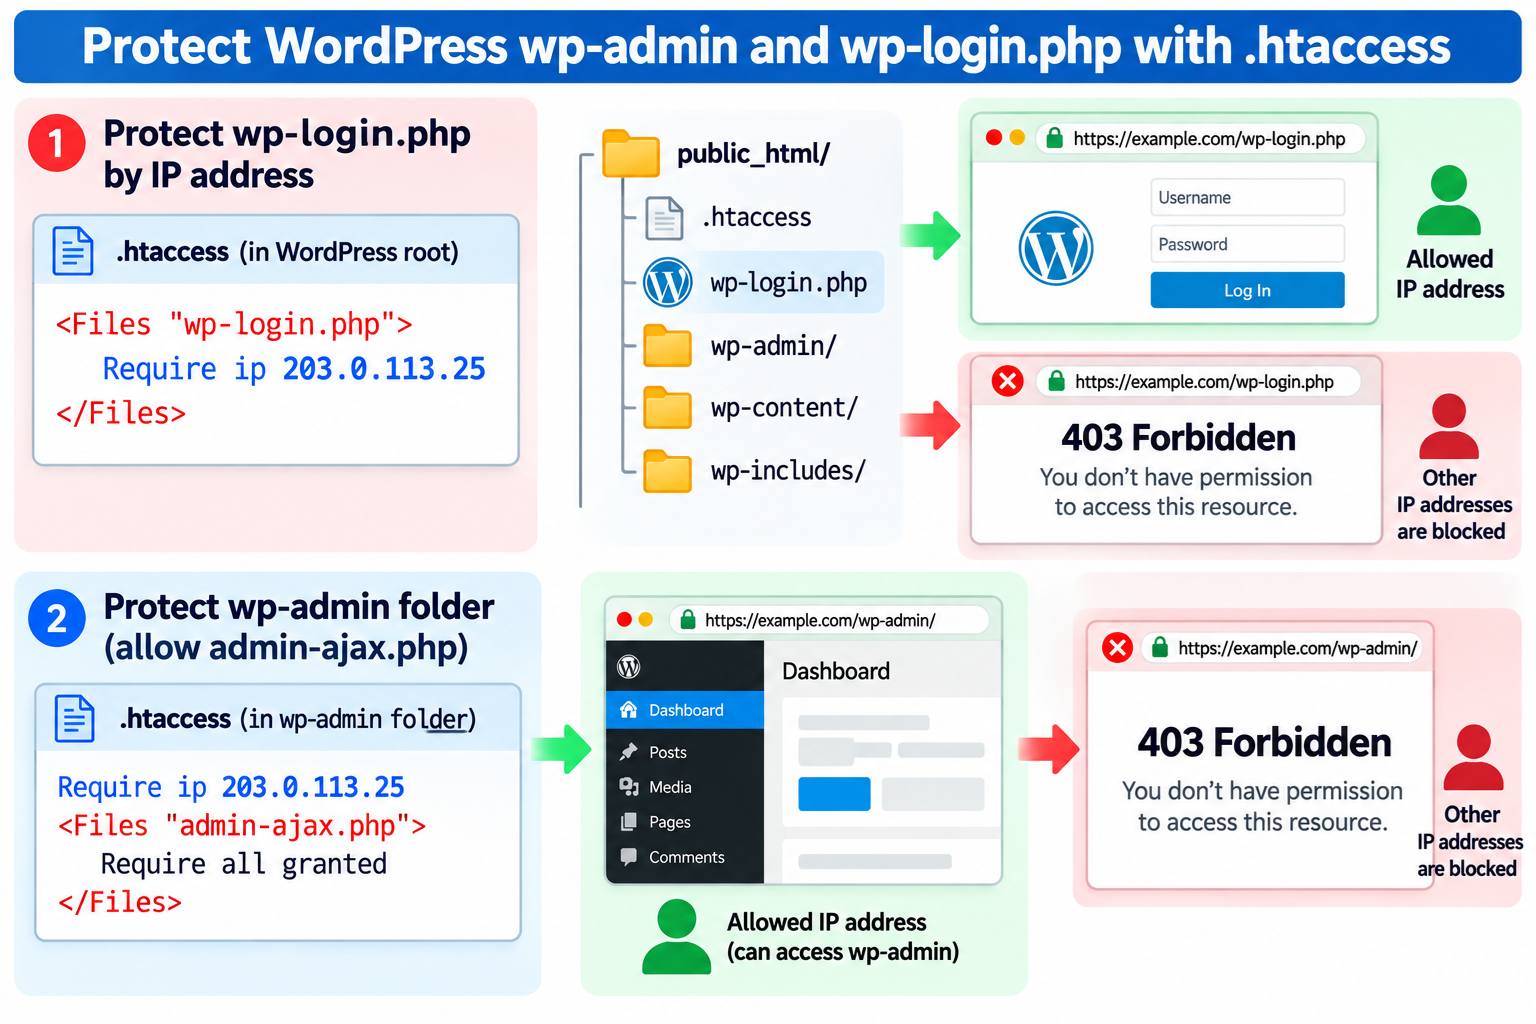
Step 2: Protect wp-login.php Using an IP Address
If you normally manage your WordPress website from a fixed public IP address, you can restrict access to the login endpoint.
For example, suppose your public IP address is:
203.0.113.25
This is a documentation example. Replace it with your actual public IP address.
In the .htaccess file located in your WordPress installation directory, add:
<Files "wp-login.php">
Require ip 203.0.113.25
</Files>
This uses Apache 2.4 authorization syntax.
When the configuration applies correctly, Apache allows access to wp-login.php from the specified IP address.
Requests from other addresses are denied.
For example, an authorized visitor requesting:
https://example.com/wp-login.php
can reach the normal WordPress login page.
An unauthorized visitor will typically receive:
403 Forbidden
This creates an additional restriction before WordPress processes the login request.
However, the example is suitable only when access from a known public IP address is practical.
If your ISP frequently changes your public IP address, you may lose access when it changes.
Also, your computer’s private network address, such as 192.168.1.100, is generally not the public address Apache sees when your connection passes through a home router.
Step 3: Allow Multiple IP Addresses
Sometimes you need to access WordPress from several locations.
For example, you may administer the website from your office and your home.
Apache 2.4 allows multiple IP addresses in a Require ip directive.
For example:
<Files "wp-login.php">
Require ip 203.0.113.25 198.51.100.40
</Files>
In this example, requests from either listed IP address are allowed.
All other client addresses are denied by the authorization requirement, assuming no conflicting configuration changes the effective access policy.
You can also use a CIDR network range where appropriate.
For example:
Require ip 203.0.113.0/24
However, allowing an entire network range grants access to more addresses than allowing one exact address.
Only use ranges when you understand which clients they include.
For maximum restriction, prefer the smallest practical list of trusted public IP addresses.
Step 4: Restrict Access to the wp-admin Directory
You can also restrict access to the WordPress administration directory.
Navigate to:
public_html/wp-admin/
Create or edit the .htaccess file inside that directory.
Add:
Require ip 203.0.113.25
Replace the example address with your actual public IP.
With the rule in effect, Apache restricts access to resources in wp-admin according to the specified authorization requirement.
This may protect administrative PHP pages and other resources located inside the directory.
However, this method has an important limitation.
Some WordPress functionality uses files inside wp-admin even when the visitor is not logged in.
A particularly important example is:
wp-admin/admin-ajax.php
WordPress plugins and themes may use admin-ajax.php for requests originating from public-facing pages.
If you block the entire wp-admin directory, some frontend functionality may stop working.
This is why you should not automatically add a blanket IP restriction to wp-admin without considering the files that need public access.
Step 5: Understand Why admin-ajax.php Matters
The admin-ajax.php file is part of WordPress’s AJAX request handling system.
AJAX allows webpages to communicate with the server without requiring a complete page reload.
For example, a WordPress plugin may use AJAX for search suggestions, interactive forms, shopping cart updates, or other dynamic features.
Although the file is physically located inside wp-admin, requests to it can originate from ordinary website visitors.
If your server blocks the entire wp-admin directory, public-facing AJAX features may fail.
For this reason, an IP restriction should be designed to allow legitimate access to admin-ajax.php when your website needs it.
On Apache 2.4, one possible configuration for wp-admin/.htaccess is:
Require ip 203.0.113.25
<Files "admin-ajax.php">
Require all granted
</Files>
The first directive restricts the administrative directory to the specified IP address.
The Files section supplies a more specific authorization rule for admin-ajax.php.
In a conventional Apache 2.4 configuration, this allows ordinary visitors to access admin-ajax.php while the remaining administrative resources stay restricted.
However, authorization merging behavior and existing server rules can affect the final result.
You should test this configuration on your actual hosting environment rather than assume it behaves identically everywhere.
Also remember that allowing access to admin-ajax.php does not mean that every AJAX action becomes publicly authorized.
WordPress and the relevant plugins must still enforce appropriate authentication, permissions, and request validation.
Step 6: Consider Other WordPress Administration Endpoints
admin-ajax.php is not the only file that may require special treatment.
Some WordPress features and plugins use:
wp-admin/admin-post.php
This endpoint can process form submissions and other actions registered through WordPress.
Certain admin-post.php actions are designed for visitors who are not logged in.
For example, a plugin might use it to handle a public contact form or another frontend submission.
If you apply a blanket wp-admin restriction, these requests may also be blocked.
You should therefore inspect your website’s actual behavior before creating permanent restrictions.
If your website requires public access to admin-post.php, you may need an additional narrowly scoped exception.
For example, inside wp-admin/.htaccess:
Require ip 203.0.113.25
<FilesMatch "^(admin-ajax|admin-post)\.php$">
Require all granted
</FilesMatch>
This example allows requests to the two named endpoints while keeping the remaining directory subject to the IP restriction.
However, only create an exception for an endpoint your website genuinely needs.
WordPress application-level authorization must still protect privileged actions.
A public endpoint should not be assumed safe merely because it is part of WordPress core.
Step 7: Protect wp-login.php with an Additional Password
IP restrictions are useful when you have a stable public IP address.
However, many website administrators work from changing locations or use internet connections with dynamic IP addresses.
In those cases, an additional password prompt may be more practical.
Apache supports HTTP Basic Authentication.
With this method, visitors must provide an additional username and password before they can access a protected resource.
For example, visitors opening:
https://example.com/wp-login.php
may first see a browser authentication prompt.
After entering the correct HTTP authentication credentials, they can access the usual WordPress login page.
They must then authenticate with their normal WordPress account.
This creates two separate authentication layers.
It is particularly useful for small websites managed by a limited number of administrators.
However, Basic Authentication must be used over HTTPS because credentials are not encrypted by the Basic Authentication mechanism itself.
Step 8: Create an .htpasswd File
Apache Basic Authentication typically uses a password file containing usernames and password hashes.
This file is often named:
.htpasswd
For security, store it outside the website’s publicly accessible document root whenever possible.
For example, a hosting account might use a location such as:
/home/accountuser/.htpasswd
This path is only an example. Your hosting provider may use a different filesystem structure.
If you have SSH access and the Apache htpasswd utility is available, you can create a password file using a command such as:
htpasswd -c -B /home/accountuser/.htpasswd adminshield
The -c option creates a new password file.
The -B option requests bcrypt password hashing on supported Apache installations.
The command prompts you to enter and confirm a password.
Do not repeatedly use -c when adding additional users to an existing file because it recreates the file.
Choose a strong password that is different from your WordPress account password.
If you use cPanel, a directory privacy or password protection feature may provide an easier way to configure HTTP authentication without manually creating the password file.
Step 9: Add Password Protection to wp-login.php
After creating the password file, open your WordPress root .htaccess file.
Add the following configuration outside the WordPress-managed rewrite section:
<Files "wp-login.php">
AuthType Basic
AuthName "Restricted WordPress Login"
AuthUserFile "/home/accountuser/.htpasswd"
Require valid-user
</Files>
Replace the example AuthUserFile path with the actual absolute filesystem path to your password file.
AuthType Basic enables HTTP Basic Authentication.
AuthName defines the authentication realm displayed by the browser.
AuthUserFile identifies the password file Apache will use.
Require valid-user allows access after a user successfully authenticates with valid credentials from the configured authentication provider.
When you open wp-login.php, the browser should request the additional credentials before displaying the WordPress login page.
Important: Some WordPress plugins and integrations communicate programmatically with wp-login.php. Basic Authentication can interrupt these workflows unless the clients are configured appropriately.
Test logout behavior, password resets, and any external login integrations before deploying this protection permanently.
Step 10: Password-Protect the wp-admin Directory
You can also add Basic Authentication to the wp-admin directory.
For example, inside wp-admin/.htaccess:
AuthType Basic
AuthName "Restricted WordPress Administration"
AuthUserFile "/home/accountuser/.htpasswd"
Require valid-user
This requires a valid HTTP authentication username and password to access resources in the directory.
However, the same compatibility concerns apply.
If public AJAX or form endpoints require access to files inside wp-admin, password-protecting the entire directory may interrupt those requests.
You may need carefully designed exceptions or a different protection method.
For example, an administrator-only staging website may be suitable for directory-wide Basic Authentication.
A public WooCommerce website with dynamic frontend functionality may require a different approach.
There is no single .htaccess configuration that is guaranteed to work with every WordPress theme and plugin combination.
For a production website, protecting the login endpoint alone may be simpler than applying blanket authentication to the entire wp-admin directory.
Step 11: Do Not Confuse Basic Authentication with WordPress Two-Factor Authentication
Apache Basic Authentication and WordPress two-factor authentication are different security mechanisms.
Basic Authentication adds a separate HTTP authentication requirement before a request reaches the protected resource.
Two-factor authentication, often abbreviated as 2FA, strengthens the WordPress account login process by requiring an additional authentication factor.
For example, a WordPress 2FA system may require a time-based code generated by an authenticator application or a supported security key.
Basic Authentication can reduce exposure to automated login requests, but it does not replace properly configured WordPress 2FA.
Likewise, 2FA does not automatically restrict which IP addresses can request wp-login.php.
For stronger security, these mechanisms may be combined where operationally appropriate.
However, avoid adding so many overlapping controls that legitimate administrators and automated integrations become unable to access the website.
Step 12: Block Suspicious Login Requests Using mod_rewrite
Apache’s mod_rewrite module can also control selected requests to the WordPress login file.
For example, if you have a stable public IP address and prefer a rewrite-based rule, you can use:
RewriteEngine On
RewriteCond %{REQUEST_URI} ^/wp-login\.php$ [NC]
RewriteCond %{REMOTE_ADDR} !^203\.0\.113\.25$
RewriteRule ^ - [F,L]
This example denies matching requests to the root-level wp-login.php endpoint when Apache sees a client IP address other than the example address.
The F flag returns a forbidden response.
The L flag ends processing of the current rewrite ruleset.
The NC flag makes the URI condition case-insensitive.
However, this method depends on the request path and the client IP address Apache sees.
If WordPress is installed in a subdirectory, the path must be adjusted.
If Apache is behind Cloudflare or another reverse proxy, REMOTE_ADDR may refer to the proxy rather than the original visitor.
For a straightforward Apache 2.4 setup, the Files and Require ip method is generally easier to read and maintain.
Do not add multiple overlapping IP restriction methods unless there is a clear reason.
Step 13: Be Careful When Using Cloudflare or a Reverse Proxy
Many WordPress websites use Cloudflare or another content delivery network.
In these environments, the connection arriving at Apache may come from a proxy server rather than directly from the website visitor.
For example, Apache may see the proxy’s IP address as the client.
This can affect rules based on Require ip or REMOTE_ADDR.
If you restrict wp-login.php to your home IP while Apache only sees proxy IPs, your access-control rule may deny legitimate requests.
Some hosting environments configure Apache’s mod_remoteip module to restore the original visitor IP using trusted proxy headers.
However, this must be implemented carefully.
The server must accept forwarded client addresses only from trusted proxies.
You should never simply trust arbitrary client-supplied headers such as X-Forwarded-For for security decisions.
If your website uses Cloudflare, restricting access through the CDN’s access-control or WAF features may be more practical than applying an origin-level IP allowlist.
For example, you could configure policies for sensitive login URLs while leaving necessary public WordPress endpoints accessible.
The appropriate method depends on the CDN configuration and how requests reach your origin server.
Step 14: Do Not Block wp-admin Completely Without Testing
A common recommendation found in older WordPress security tutorials is to block the entire wp-admin directory for everyone except selected IP addresses.
Although this can work for certain websites, it can also break legitimate features.
WordPress plugins may send frontend AJAX requests to admin-ajax.php.
Some public forms may use admin-post.php.
Other plugins may depend on specific administrative resources for frontend functionality.
If these requests are denied, visitors may experience broken forms, failed searches, missing dynamic content, or other unexpected problems.
For example, a shopping cart may rely on AJAX to update totals or other page elements.
You should therefore test important public pages after applying restrictions.
For a public website, begin with narrowly scoped protection of wp-login.php and then evaluate whether additional wp-admin restrictions are suitable.
This is usually easier to troubleshoot than applying a broad directory block immediately.
Step 15: Protect XML-RPC Carefully
Another commonly discussed WordPress endpoint is:
xmlrpc.php
WordPress XML-RPC provides remote communication capabilities for certain applications and integrations.
Historically, attackers have also abused XML-RPC functionality for authentication attacks and other unwanted activity.
If your website does not need XML-RPC, you may choose to deny HTTP access to the file.
For example, in the WordPress root .htaccess file:
<Files "xmlrpc.php">
Require all denied
</Files>
This configuration prevents ordinary HTTP access to xmlrpc.php when Apache applies the rule.
However, some applications and integrations may still rely on XML-RPC.
Before blocking it, determine whether any legitimate service requires it.
Also remember that disabling XML-RPC does not disable the WordPress REST API, which uses different endpoints.
Blocking xmlrpc.php is an optional security measure, not a universal requirement for every WordPress installation.
Step 16: Protect wp-config.php
The wp-config.php file contains important WordPress configuration information.
Depending on the installation, it may include database connection settings, authentication keys, and other sensitive values.
It should never be accessible as a downloadable source file through the browser.
WordPress and properly configured PHP hosting normally process or protect this file appropriately, but an additional Apache access rule can provide defense in depth.
For example:
<Files "wp-config.php">
Require all denied
</Files>
Place this rule in the appropriate root .htaccess file if your hosting environment supports it.
This denies HTTP access to the file when Apache applies the rule.
The directive does not prevent WordPress itself from reading wp-config.php through normal filesystem operations.
However, storing wp-config.php and other sensitive configuration material outside publicly accessible locations where practical remains an important consideration.
Step 17: Use HTTPS for WordPress Administration
Protecting the login page is less effective if credentials can be exposed through an unencrypted connection.
Your website should use HTTPS for administrator logins and dashboard access.
HTTPS uses TLS to protect data transmitted between the browser and the HTTPS endpoint.
This includes usernames, passwords, authentication cookies, and other sensitive request data.
If you use Apache, HTTP-to-HTTPS redirection may be configured through your hosting panel, virtual host configuration, or .htaccess.
For example, on a conventional Apache server that directly terminates HTTPS, a basic redirect may use:
RewriteEngine On
RewriteCond %{HTTPS} off
RewriteRule ^ https://example.com%{REQUEST_URI} [R=301,L]
Replace example.com with your own domain.
If your website uses a reverse proxy or CDN, HTTPS redirection may need to be handled at that layer instead.
Verify that your TLS certificate is valid and that WordPress is configured to use the correct HTTPS website address.
Basic Authentication credentials should never be transmitted over an ordinary unencrypted HTTP connection.
Step 18: Test Your Login Protection Rules
After applying any .htaccess security rule, test it carefully.
First, open your WordPress login page from an authorized connection.
For example:
https://example.com/wp-login.php
Verify that the login page is accessible or that the expected additional authentication prompt appears.
Next, test from another IP address or network when possible.
If the access rule is configured correctly, an unauthorized connection should normally receive a 403 Forbidden response.
For Basic Authentication, a request without valid credentials should normally receive a 401 Unauthorized response with a WWW-Authenticate header.
You can inspect headers using curl:
curl -I https://example.com/wp-login.php
Then test normal WordPress login and logout operations.
Also test password recovery, frontend forms, AJAX-powered features, and any plugin integrations.
If you restricted wp-admin, verify that required endpoints such as admin-ajax.php still function.
Do not use your only active WordPress administrator session as your sole recovery method.
Keep File Manager, SFTP, or another independent hosting access method available while testing.
Step 19: What to Do If You Get Locked Out
A configuration mistake can prevent even authorized administrators from accessing wp-login.php or wp-admin.
If this happens, use your hosting control panel or SFTP client to restore the previous .htaccess configuration.
For example, if you added an access rule inside:
public_html/wp-admin/.htaccess
you can temporarily rename the file to:
.htaccess.disabled
This prevents Apache from treating that particular file as the active .htaccess configuration under normal Apache settings.
However, other parent-directory or server-level restrictions may still apply.
If you added the rule to the main WordPress .htaccess file, restore your backed-up version or remove only the specific security rules you introduced.
Do not delete the complete WordPress .htaccess file unless you understand the consequences.
After restoring access, examine the Apache error log and test the corrected configuration.
If a Basic Authentication prompt continues appearing after the rule is removed, browser authentication caching or another server-level policy may be involved.
Step 20: Common Problems with wp-admin and wp-login.php Protection
1. The Website Returns a 500 Internal Server Error
A 500 error can occur if Apache rejects a directive, encounters invalid syntax, or cannot access the configured password file.
For example, an incorrect AuthUserFile path can prevent Basic Authentication from working.
Check the Apache error log for the specific error.
Also verify that your hosting provider permits authentication directives in .htaccess.
2. You Cannot Access wp-login.php
If you are using IP restrictions, confirm that your public IP address has not changed.
If you are behind a VPN or proxy, Apache may see a different client address.
If you are using Basic Authentication, check the configured password file and credentials.
3. WordPress Forms Stop Working
This may happen if the website uses admin-ajax.php or admin-post.php and your security rules block those endpoints.
Review the browser’s Network panel and identify requests returning 401 or 403 responses.
Then adjust your access policy based on the endpoints your application legitimately requires.
4. Password Reset Links Fail
WordPress password recovery uses the login system.
Additional Basic Authentication or IP restrictions can prevent users from accessing the reset process.
If your website supports public user accounts, restricting wp-login.php to a small number of IP addresses is usually inappropriate.
Consider rate limiting, 2FA, and other account-level protections instead.
5. The Rules Do Not Work on Cloudflare
Apache may see Cloudflare’s proxy addresses rather than the visitor’s real IP.
Confirm whether the server correctly restores client IP information through a trusted proxy configuration.
Alternatively, use appropriate CDN-level access policies.
6. WordPress Rewrites Your .htaccess File
WordPress may update its managed rewrite section.
Keep custom security rules outside the BEGIN WordPress and END WordPress markers.
Also maintain a backup of your configuration.
7. Bots Continue Attacking Other Endpoints
Restricting wp-login.php does not eliminate all possible attack routes.
Bots may continue probing XML-RPC, REST API endpoints, vulnerable plugins, outdated themes, or other publicly accessible resources.
Maintain broader website security controls rather than focusing only on the login page.
Which Protection Method Should You Choose?
Different WordPress websites have different access requirements.
Personal WordPress blog: If only one administrator needs access and the public IP address is stable, an IP restriction for wp-login.php can be effective.
Small business website: HTTP Basic Authentication can provide an additional barrier, especially when only a few trusted administrators need access.
Membership website: Strict IP restrictions on wp-login.php may prevent legitimate members from logging in. Rate limiting and WordPress-level authentication controls are more suitable.
WooCommerce website: Be particularly careful with blanket wp-admin restrictions because dynamic frontend features and integrations may depend on WordPress endpoints.
Managed WordPress hosting: Use the security controls supported by your hosting platform. Some providers already implement login protections, rate limiting, and server-level access restrictions.
For many public WordPress websites, a combination of strong account authentication, login rate limiting, regular software updates, and carefully scoped server protections is more practical than locking down the entire administration directory.
Additional WordPress Security Recommendations
Protecting wp-admin and wp-login.php is only one part of WordPress security.
Use strong and unique passwords for administrator accounts.
Enable two-factor authentication where practical.
Keep WordPress core, themes, and plugins updated.
Remove unused plugins and themes rather than leaving outdated software installed.
Use reputable plugins and avoid installing software from untrusted sources.
Limit administrator privileges to accounts that genuinely need them.
Maintain regular backups and periodically verify that they can be restored.
Review administrator accounts and remove accounts that are no longer needed.
Use HTTPS throughout the website, especially for login and administration.
Consider a trusted rate-limiting solution or web application firewall to reduce automated login abuse.
Monitor logs for unusual authentication activity and repeated requests to sensitive endpoints.
Most importantly, remember that a single .htaccess rule cannot protect against every possible attack.
Frequently Asked Questions
Can I block access to wp-login.php using .htaccess?
Yes. On Apache 2.4, you can use a Files directive and Require ip to permit requests only from specified addresses.
This is most appropriate for websites whose authorized users connect from predictable IP addresses.
Can I password-protect the WordPress login page?
Yes. Apache Basic Authentication can require an additional username and password before visitors reach wp-login.php.
Use HTTPS and store the password file securely outside the public web root.
Can I restrict the entire wp-admin directory?
Yes, but doing so may interrupt WordPress features that use administrative endpoints for public-facing requests.
Test admin-ajax.php, admin-post.php, and other required application functions.
Should I block admin-ajax.php?
Usually not without understanding how your website uses it.
Many WordPress themes and plugins depend on this endpoint.
Blocking it indiscriminately can break legitimate frontend functionality.
Does hiding wp-login.php make WordPress secure?
No. Changing or hiding a login URL may reduce some automated traffic, but it does not replace strong passwords, 2FA, updates, or proper access controls.
Can I use IP restrictions with a dynamic IP address?
You can, but you may be locked out when the public IP address changes.
Basic Authentication, a properly configured VPN, or an identity-aware access system may be more practical.
Will Basic Authentication affect website visitors?
If applied only to wp-login.php, it primarily affects users who need the WordPress login endpoint.
If applied broadly to wp-admin, it may also affect public-facing functionality that depends on files in that directory.
Can I block xmlrpc.php?
Yes, if your website does not require the XML-RPC endpoint.
However, review application integrations before blocking it.
Does .htaccess work on Nginx?
No. Nginx does not process Apache .htaccess files.
Equivalent protections must be configured using Nginx, your hosting platform, or another supported security layer.
Do I need to restart Apache after editing .htaccess?
Normally, no. Apache applies permitted .htaccess changes during request processing.
However, server-level configuration changes may require a reload or restart.
Is protecting wp-admin enough to prevent WordPress hacking?
No. Vulnerable plugins, themes, credentials, uploads, and hosting configurations can create other attack paths.
wp-admin protection should be part of a broader website security strategy.
Conclusion
Protecting your WordPress wp-admin directory and wp-login.php file can reduce exposure to automated login attacks and unauthorized administration attempts.
For a small website managed from a stable public IP address, a straightforward Apache 2.4 rule is:
<Files "wp-login.php">
Require ip 203.0.113.25
</Files>
Replace the example address with your actual public IP address.
For administrators who need access from changing locations, Apache Basic Authentication can provide an additional password requirement.
However, wp-admin restrictions require extra care because WordPress uses certain administrative files for legitimate public-facing operations.
In particular, do not block admin-ajax.php or admin-post.php without checking whether your website depends on them.
Always back up your .htaccess files, test changes from both authorized and unauthorized connections, and maintain an independent way to restore access.
For stronger long-term protection, combine appropriate Apache rules with HTTPS, strong passwords, two-factor authentication, regular updates, secure hosting, and login rate limiting.
A well-protected WordPress website depends on multiple layers of security, not a single configuration file.